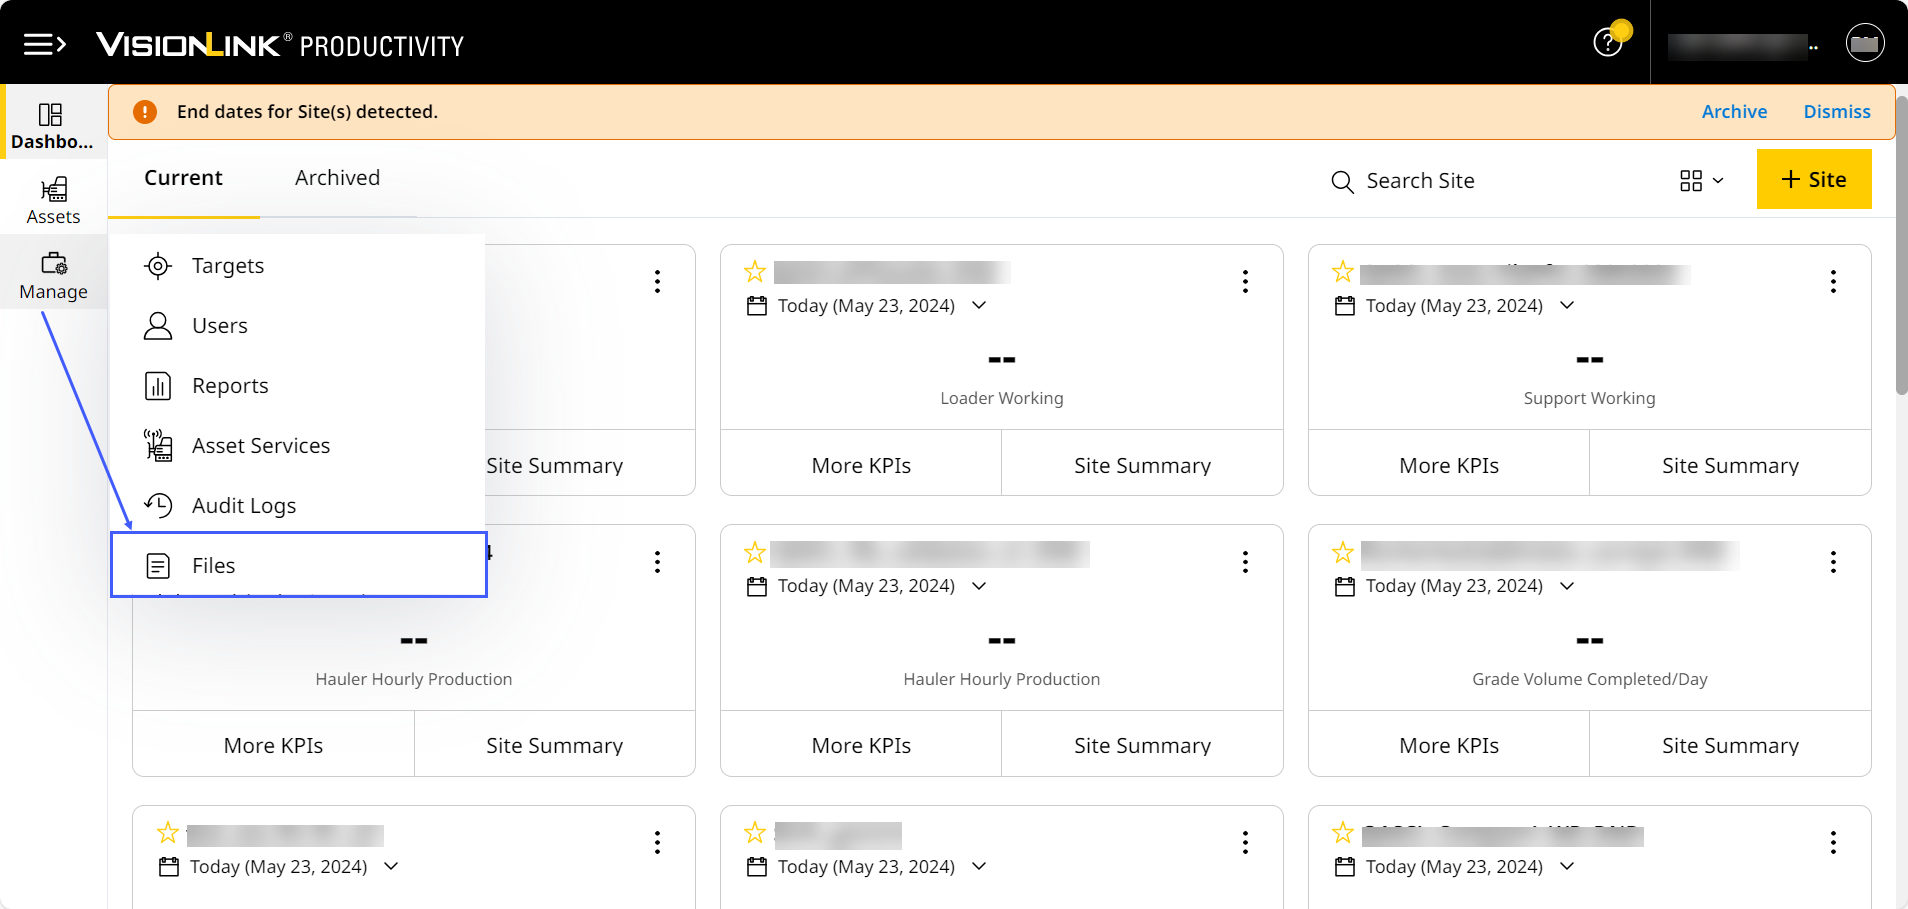
Upload Files
On Files, you can upload files to any of the sites in your account. In the same process, you can also sync them to the respective site’s asset(s).
VisionLink Productivity provides the ability to upload various file types.
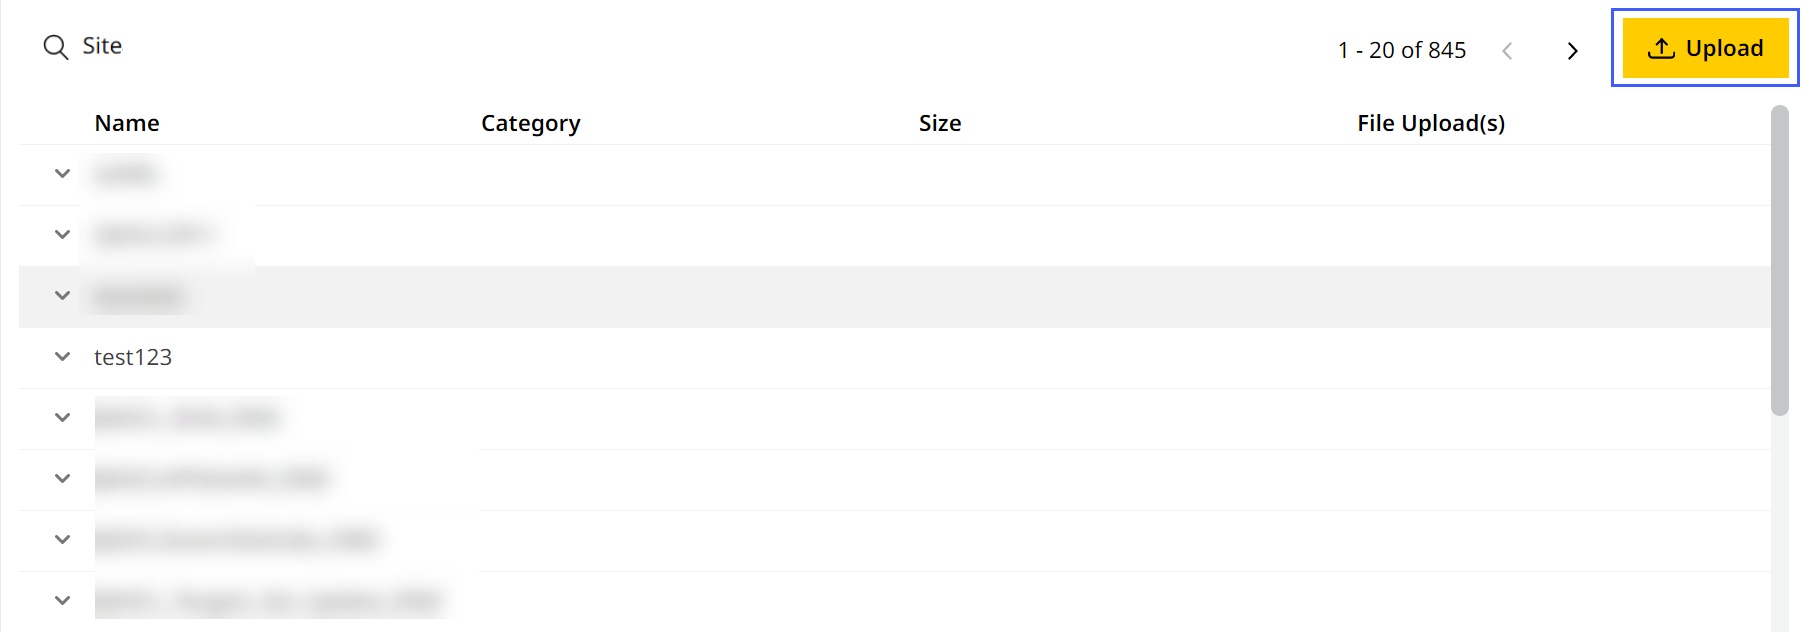
To upload a file:
-
Click
 .
.
-
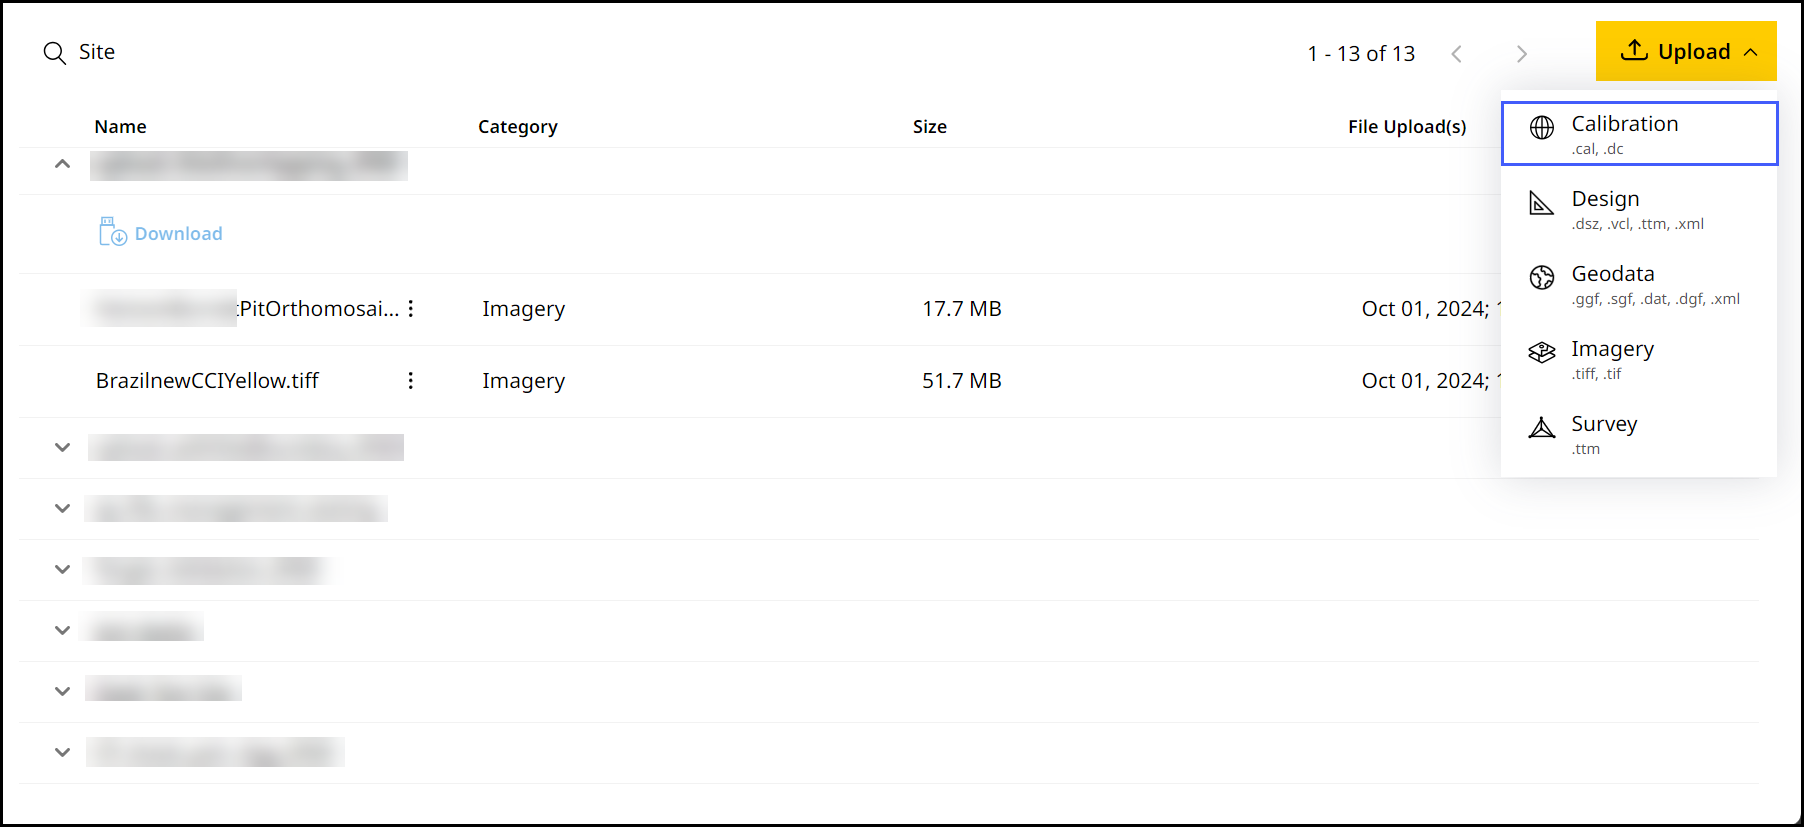
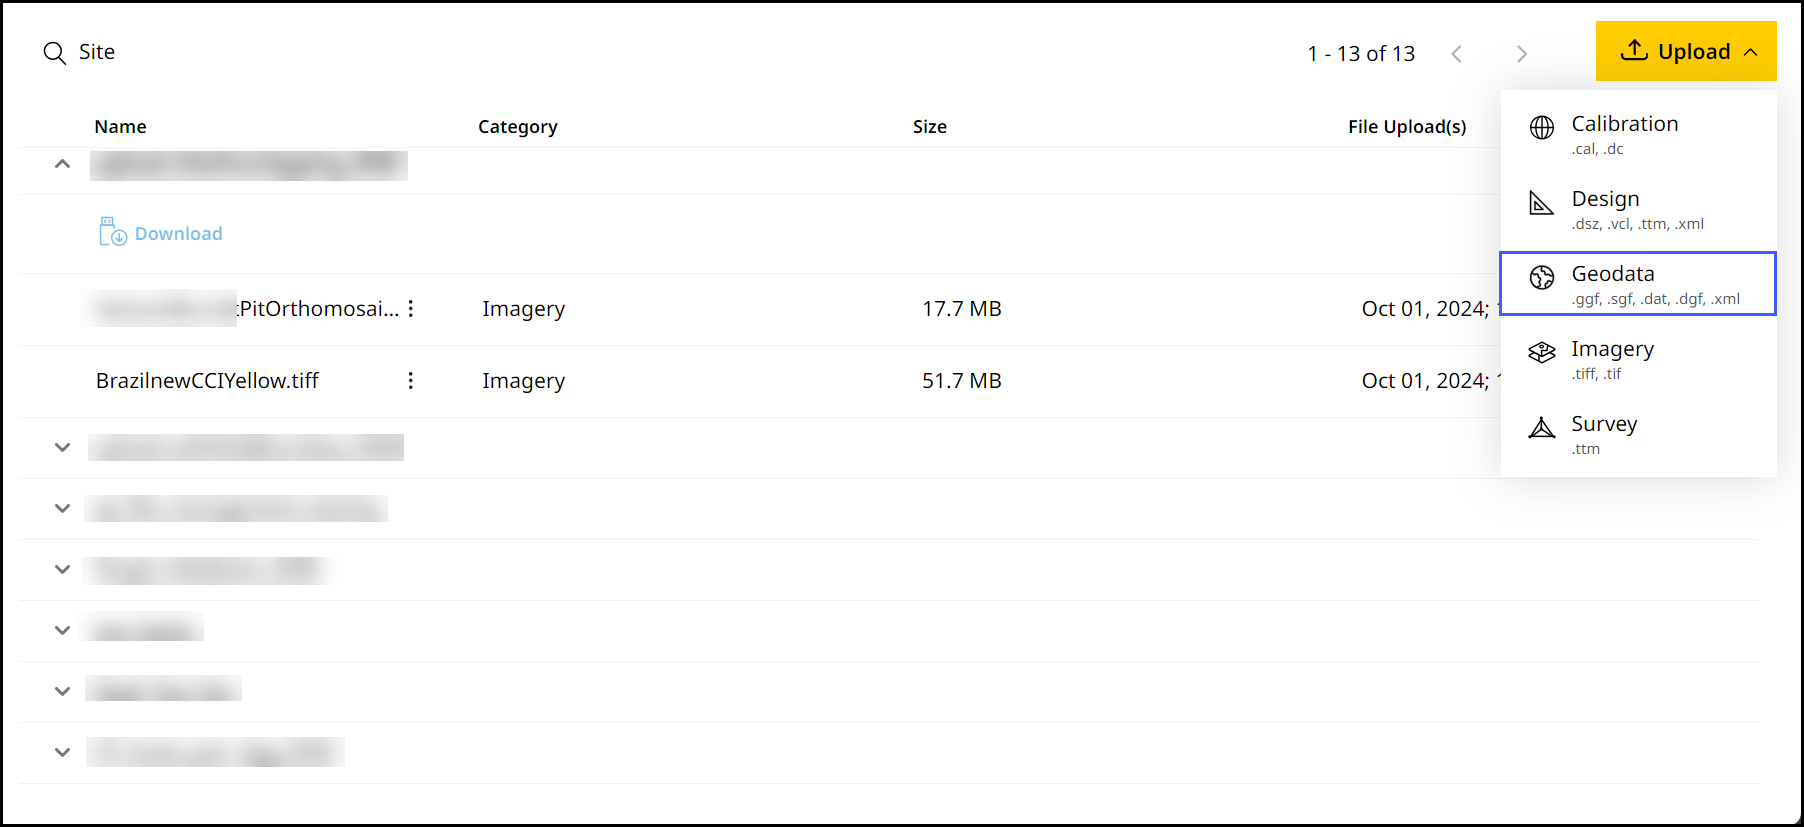
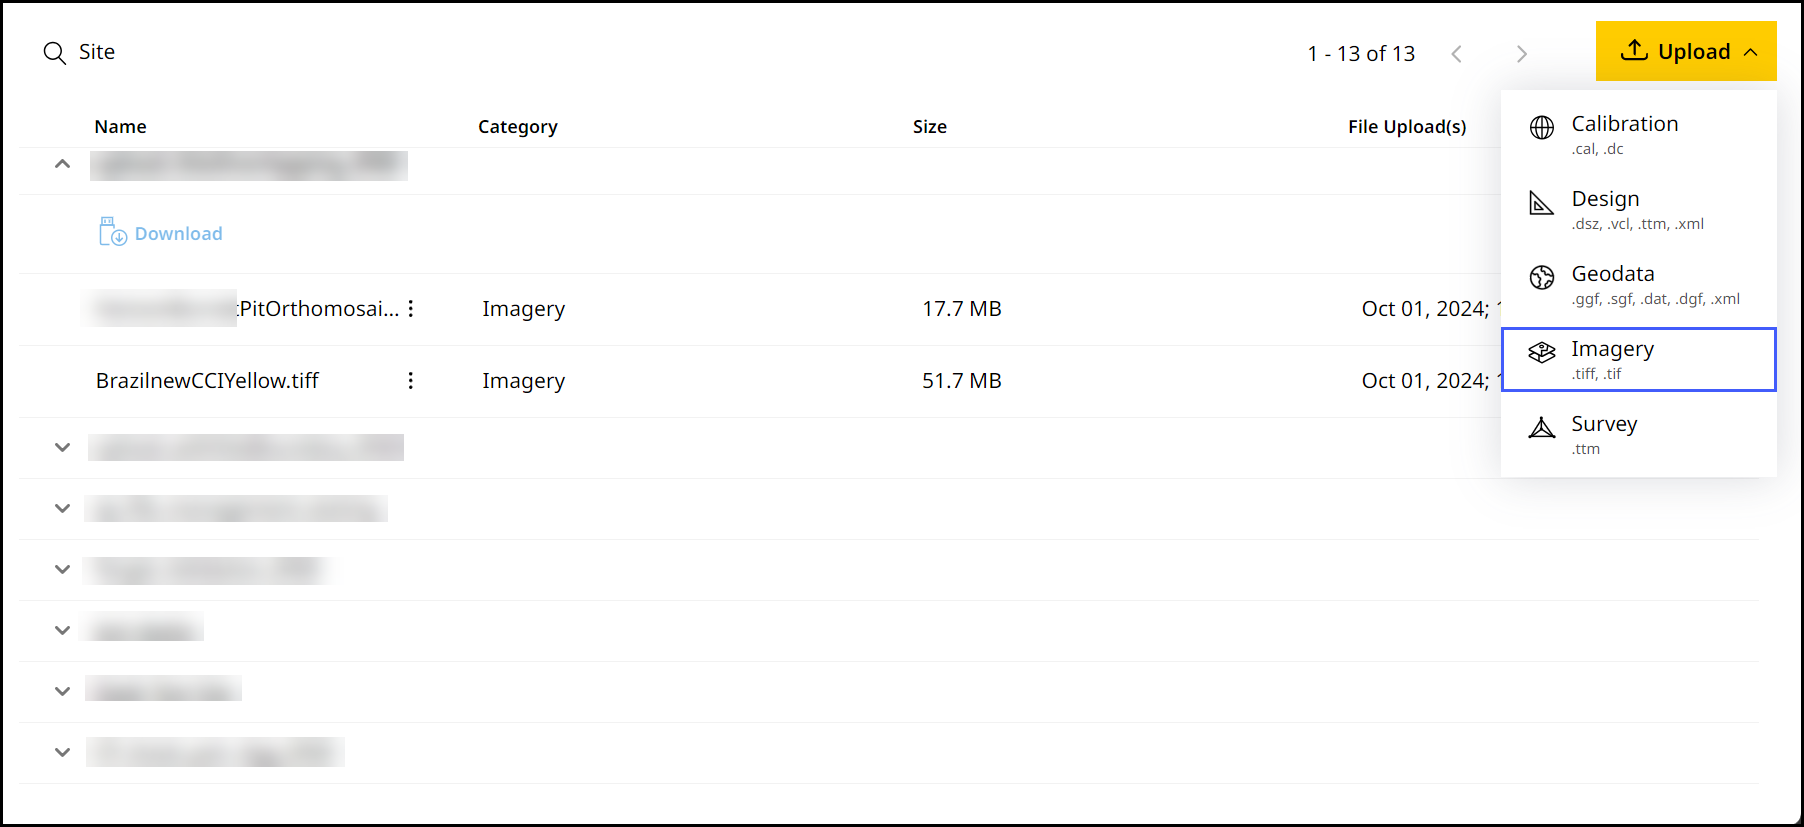
Select the file category (also lists what file types fall under each category):

With the following file types, the category to choose will depend on the following:
• For uploading CoordSystemDatabase.xml files, select Geodata.
• For uploading landXML .xml or office design .ttm files, select Design.
• For uploading survey .ttm files, select Survey.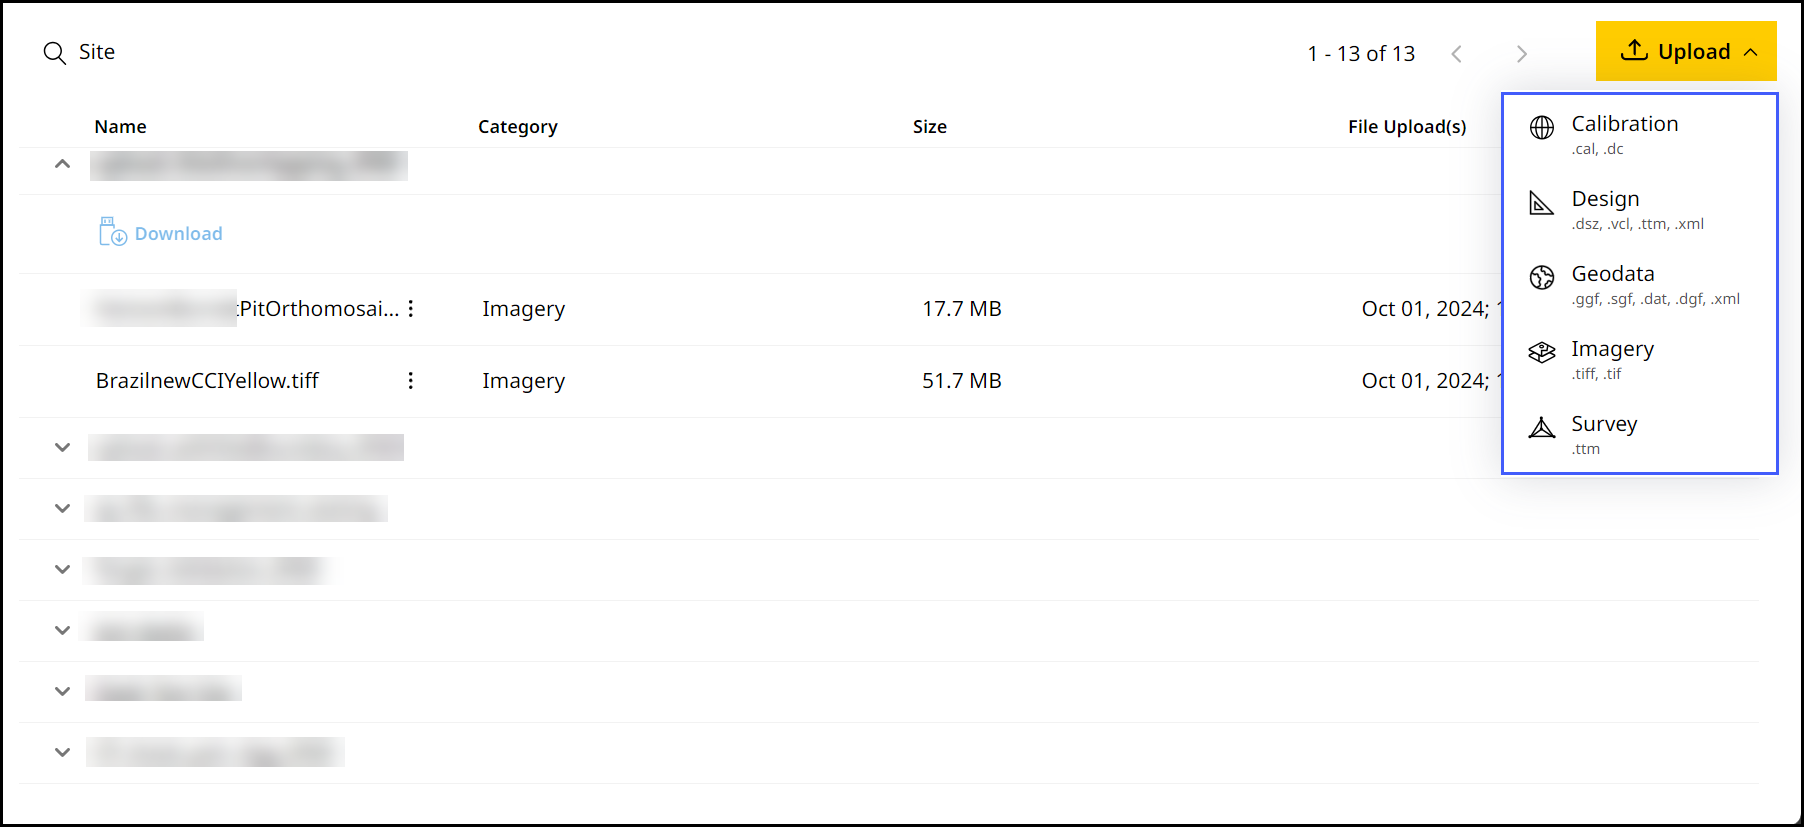
Refer to the respective sections below to know more about all the steps involved in uploading different file categories.
![]()
The following are things to keep in mind across all file types:
• You can override files previously uploaded with its latest version.
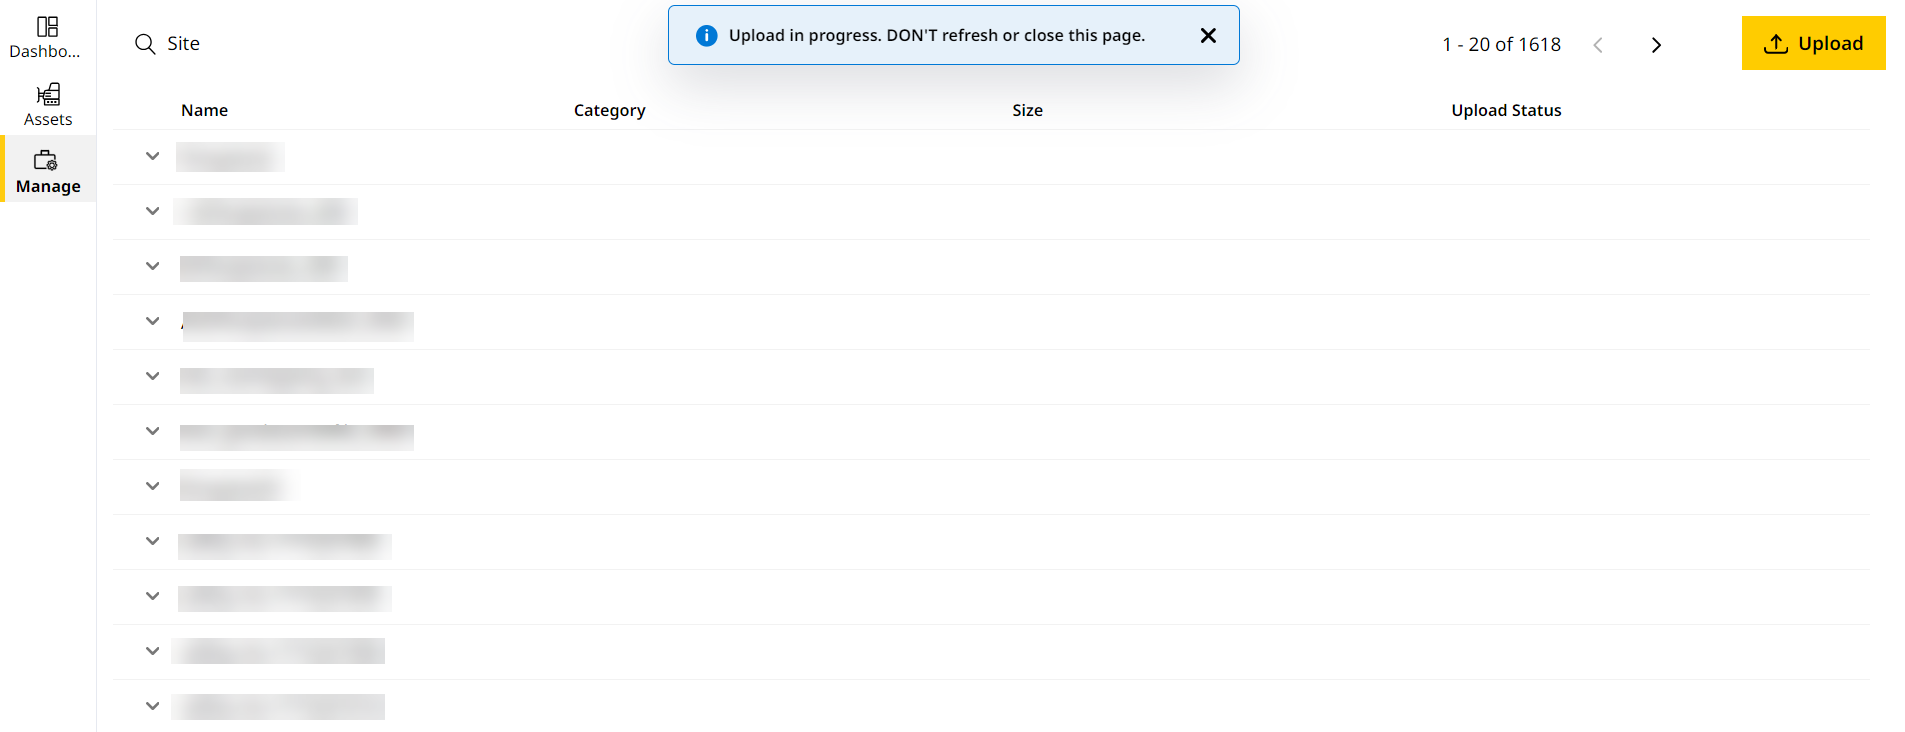
• Don't refresh or close the page while the uploading/processing of file is in progress. However, you can continue using the application and accessing other tabs.
• File names with the following characters aren’t supported: \ / * ? < > | "" % +
Uploading Avoidance Zone File
An avoidance zone file defines specific areas on a site that assets should avoid—like hazardous zones, protected areas, or unstable ground. It typically contains closed polygon shapes and is used by machine control systems to trigger warnings or prevent entry into those zones during operation.
• Upload only avoid.svl file types.
• This is available only for Grade and Compact assets visualizing and operating on 2D terrains.
• The site must have a valid calibration file before uploading avoidance zone file.
• File must include at least one closed polygon; polylines aren’t supported.
◦ File must contain no more than 800 closed polygon edges.
◦ Files with a mix of closed polygons and polylines won’t be sent to the asset.
• Intersecting polygons and elevated zones won’t be visible in the asset.
• Only one avoidance zone file is allowed per site at a time. To upload a new one, the existing file must be deleted first.
• Avoid special characters (\ / * ? < > “ “ % +) in the file name.
• File size should not be more than 50MB.
• USB download is available for this file type.
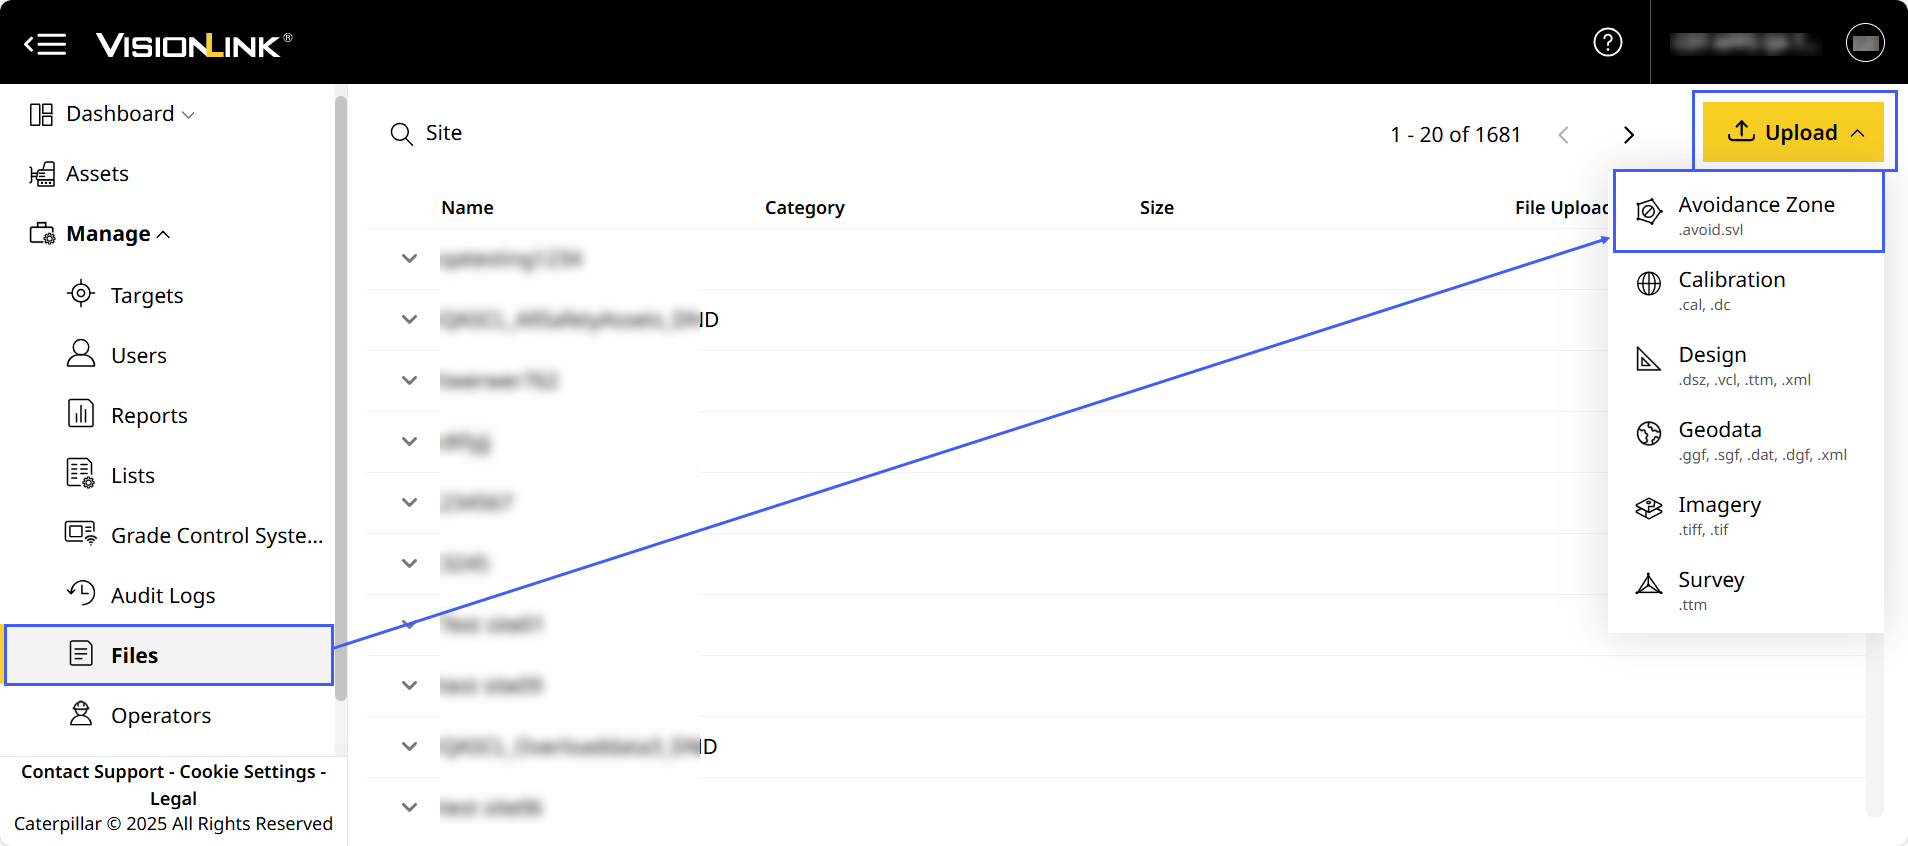
To upload avoidance zone files:
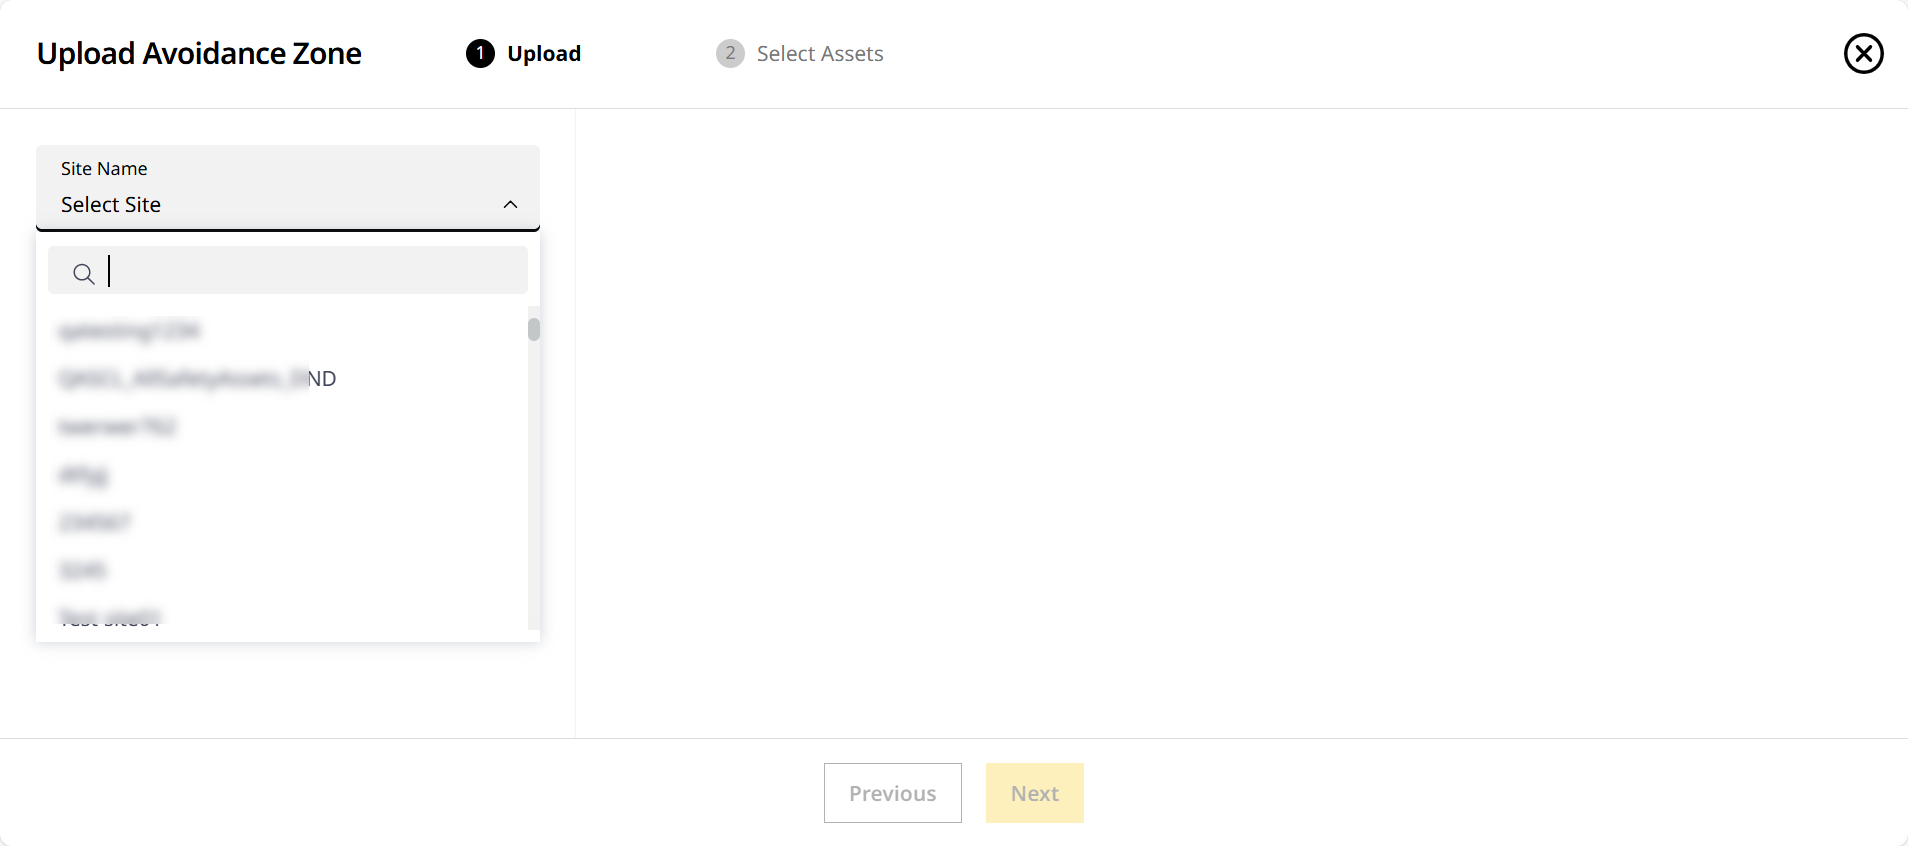
- On Files, click > select Avoidance Zone.
-
Select the desired site from the Site Name drop down.
-
Drag and drop the file from your device or click Browse to find the file.

-
Give it a few minutes for the upload to be completed.

-
Preview the processed avoidance zones by clicking Surface
 . Click Next to move to Select Assets.


• Adjust view with Zoom to Extent and Fullscreen
  options. You can also switch to either Satellite View, Terrain View or Avoidance Zone View by clicking Map Layers
  .
.
• Check Preview Files to explore more visualization features. -
On Select Assets, choose the assets where you want to send the uploaded files. Click Process & Send to proceed.
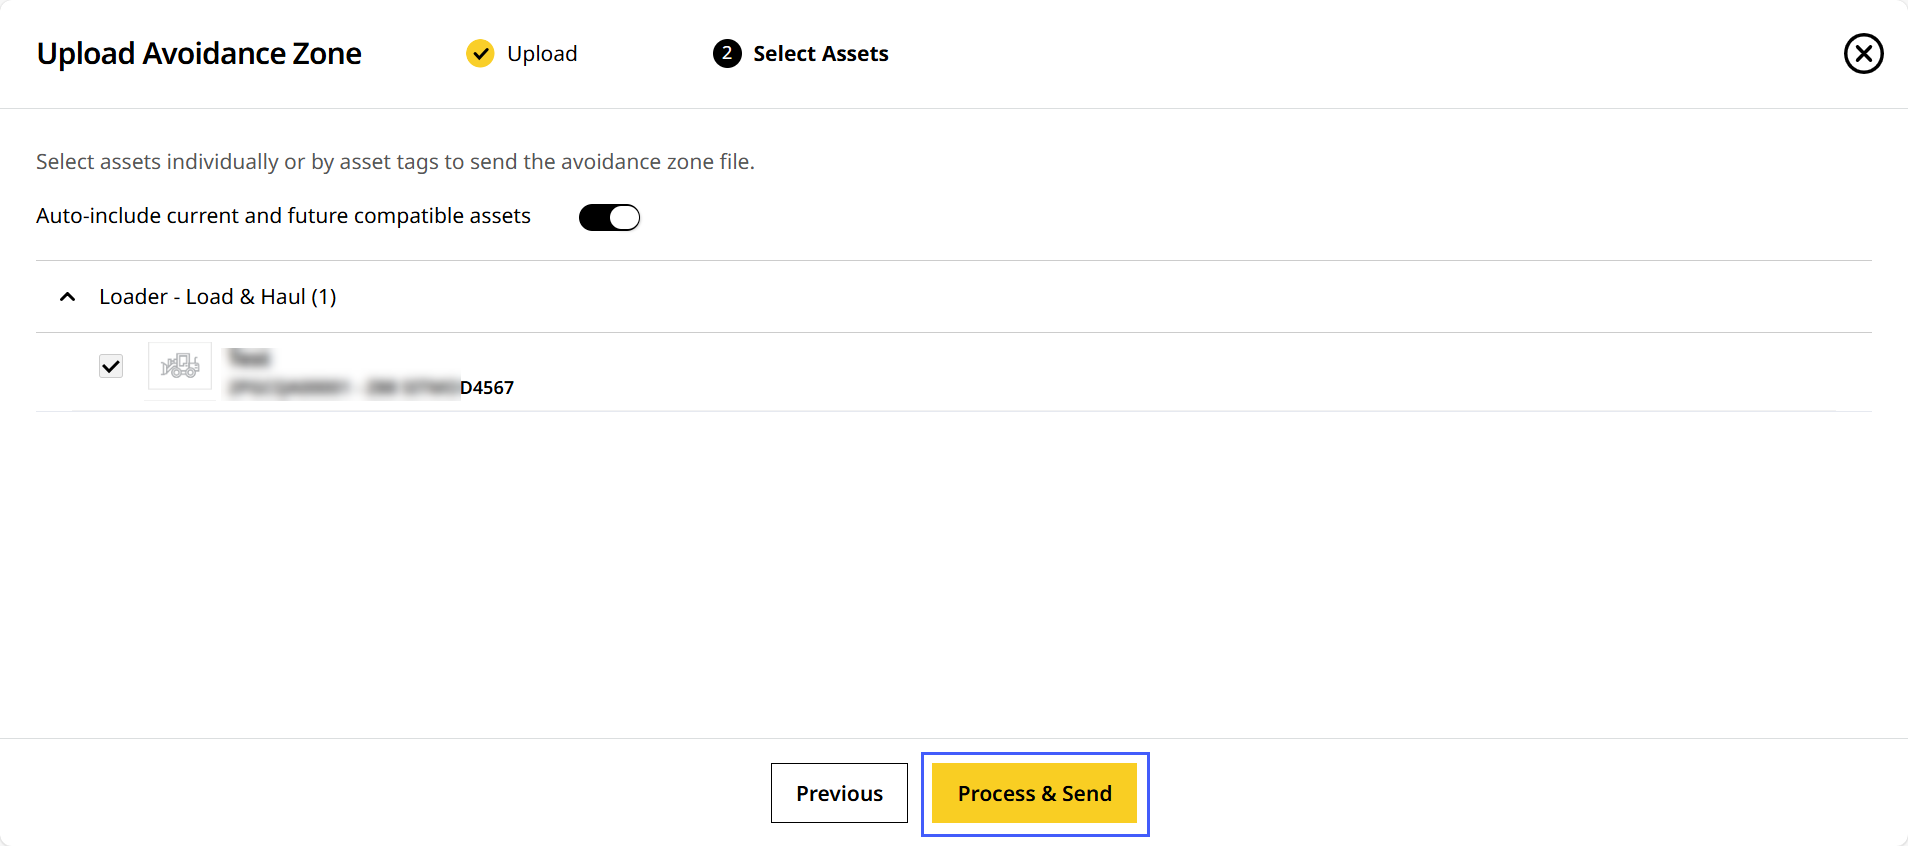
Click toggle on to select all assets in the list below and any more compatible assets added to the site in the future. This ensures the file will be synced to all of them going forward.
Uploading Calibration Files
Calibration files are used by asset's machine control systems. They convert latitude, longitude and height values into northing, easting and elevation grid values. This calibration file can be sent wireless to the asset and also used for displaying data on VisionLink Productivity.
• Only one active calibration file can be uploaded to a site.
• To upload a calibration file, a site should have an existing site boundary or you will need to create one. Refer to Create or Modify Site Boundary to Upload Calibration File to know more.
• The calibration file may reference other files like geoid or grid datum files located in the geodata folder. If you’re planning to also upload geodata file(s), ensure the uploaded calibration file has their file name(s) referenced. Contact your survey manager to get the required site calibration and optional geodata files.
• Any VisionLink Productivity site that monitors grade productivity can have only one calibration file.
• You need to upload a calibration file if you're adding Grade or Compact assets to your site.
• The projections supported in the calibration files are:
◦ Transverse Mercator
◦ Mercator
◦ Lambert Conformal Conic 1
◦ Lambert Conformal Conic 2
◦ Oblique Sterographic
◦ Oblique Conformal Cylindrical
◦ Oblique Mercator Angle
◦ Albers Equal Area Conic
If you have any projections beyond those mentioned above, please Contact Support ![]() .
.
To upload calibration files:
-
On Files, click
> select Calibration.
-
Select Upload from the expanded menu.

-
Select the desired site from the Site Name drop down.
On the Site Name drop down, you can search for your desired site in case to quickly find and select them.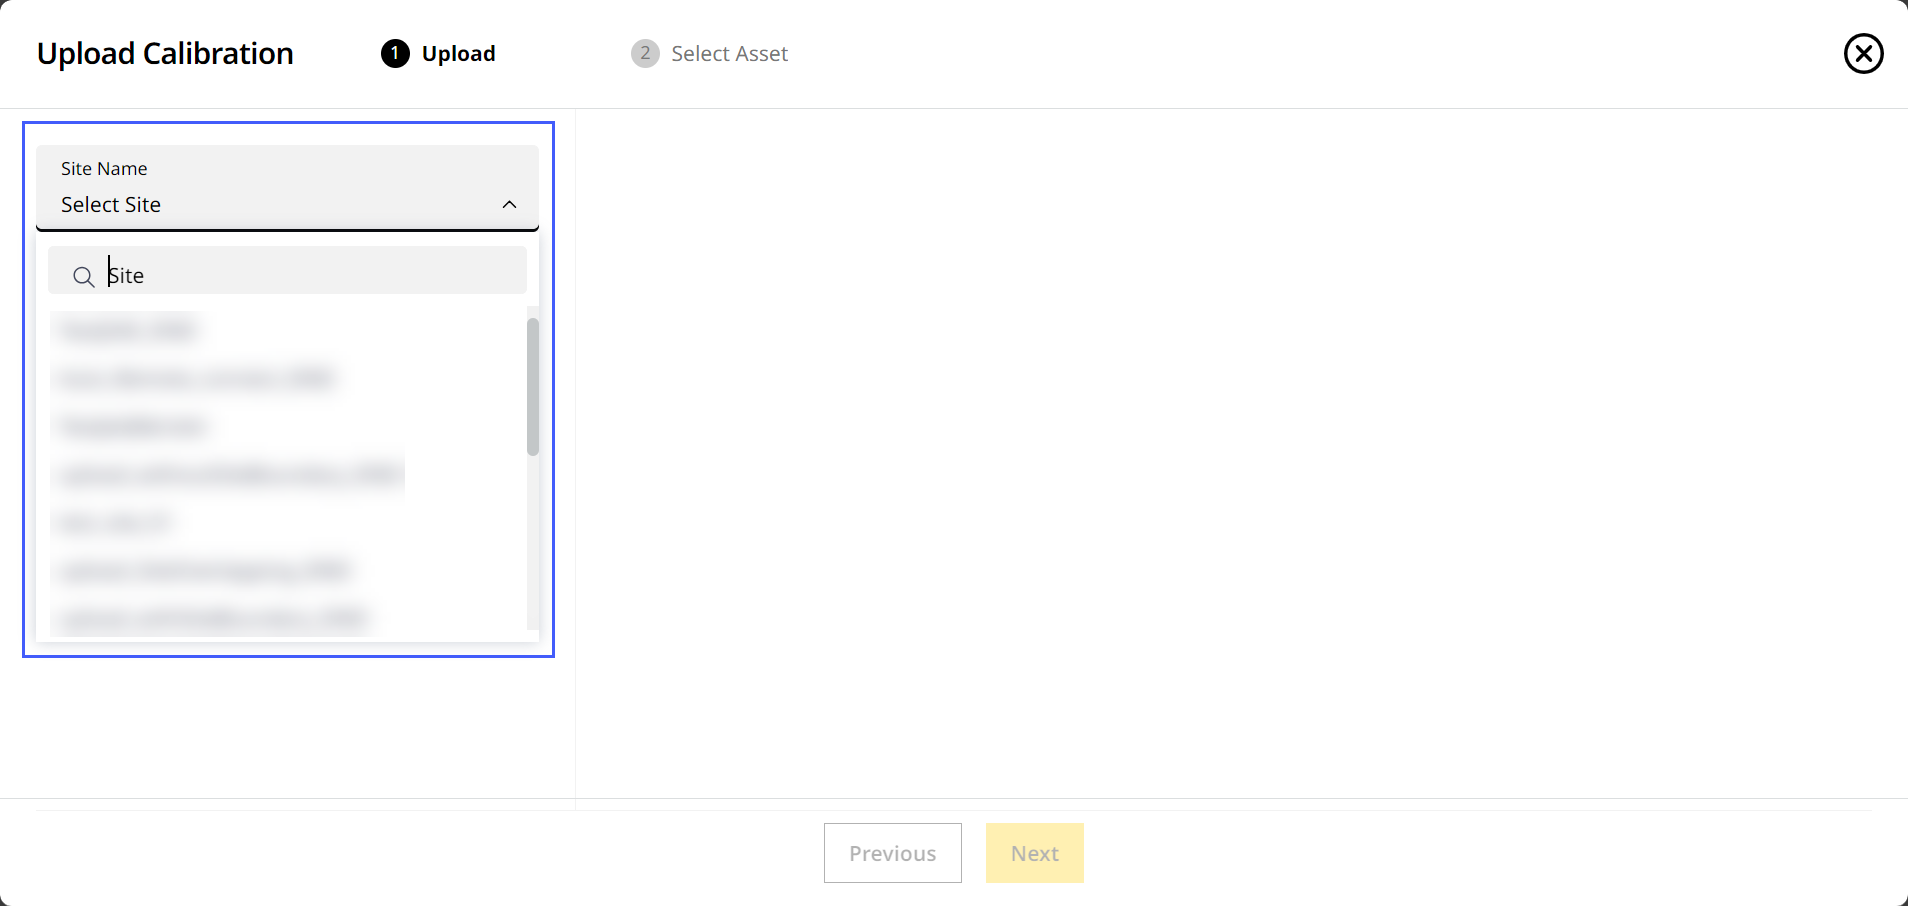
-
Drag and drop the file from your device or click Browse to find the file.
• On Upload Calibration, you can only upload .cal and .dc file types.
• Uploading a new calibration file replaces the previously uploaded calibration file and all associated data, including existing calibration files, surveys, design files, and geodata, which will no longer be available. After the upload, all new asset data will be processed only using the updated calibration (.cal) file.
View ImageView Image


-
If the calibration uses a geoid, the referenced geoid file (.ggf) and CoordinateSystemDatabase.xml are displayed. Keep the checkboxes selected to upload these files with the calibration. Select Upload.

-
Give it a few minutes for the upload to complete.
-
A successful upload of the file will be denoted in the Status column.
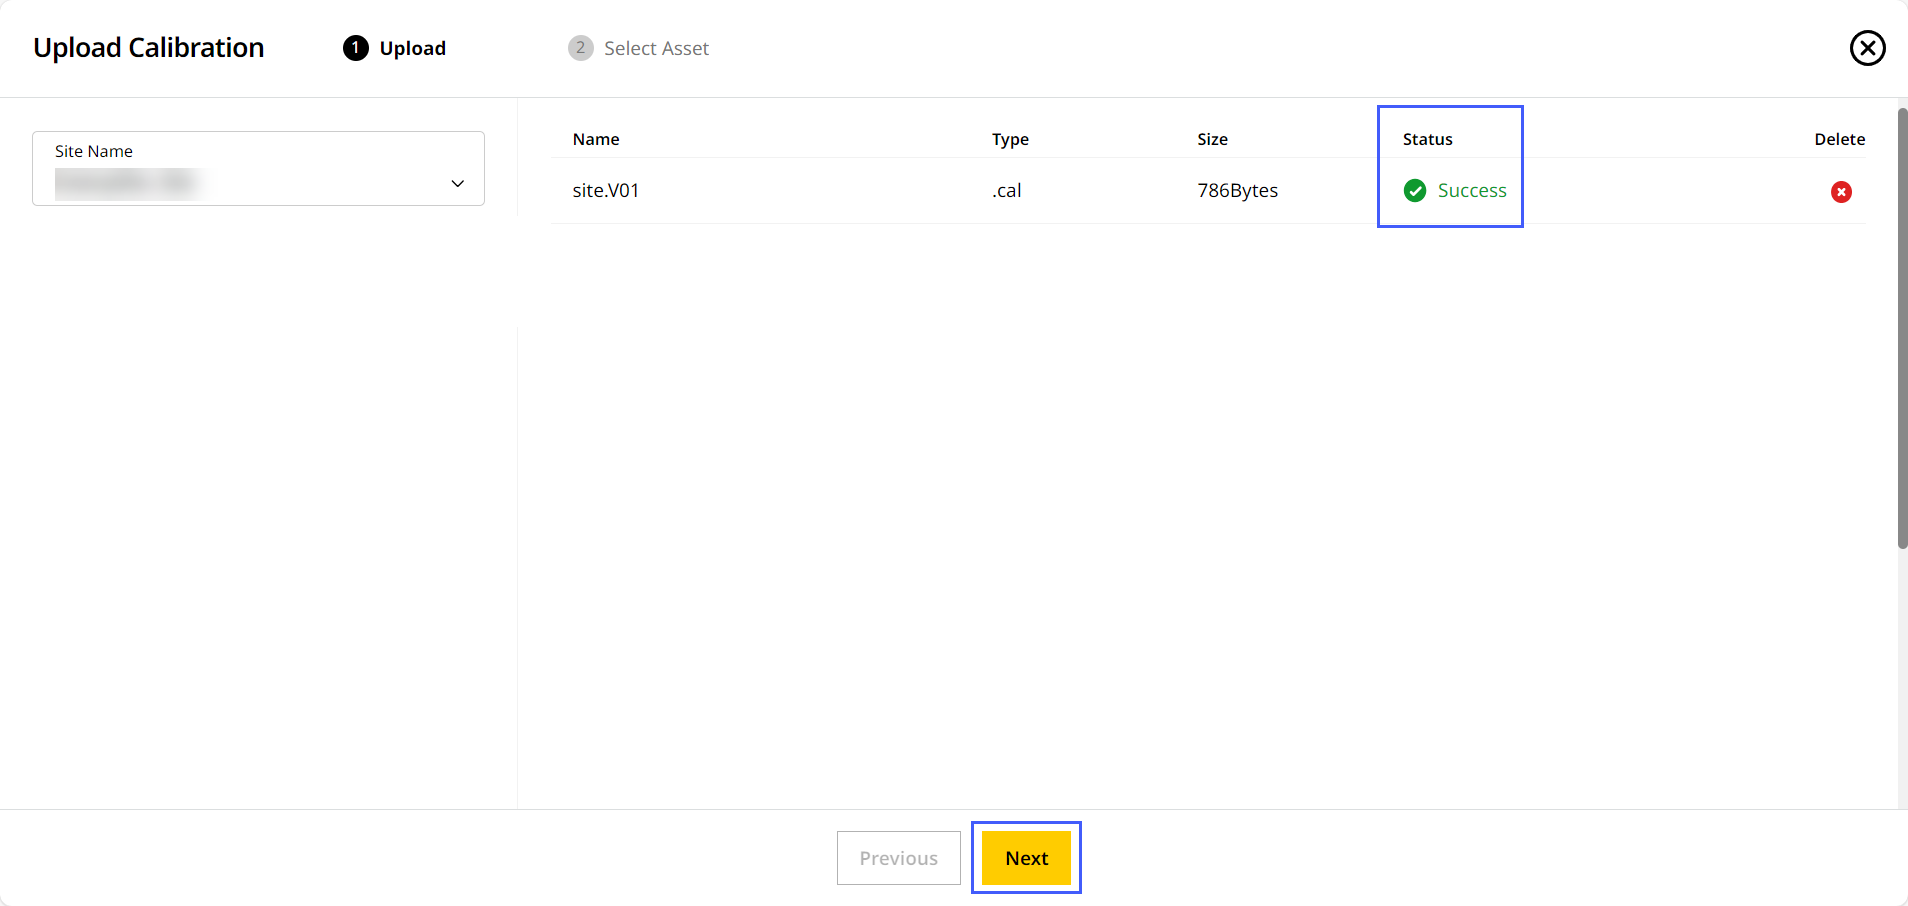
If the calibration file references a geoid file that is not available, only the calibration is uploaded. Upload the referenced file separately to ensure the calibration can be used correctly on the asset. Refer to Uploading Geodata Files to know more. -
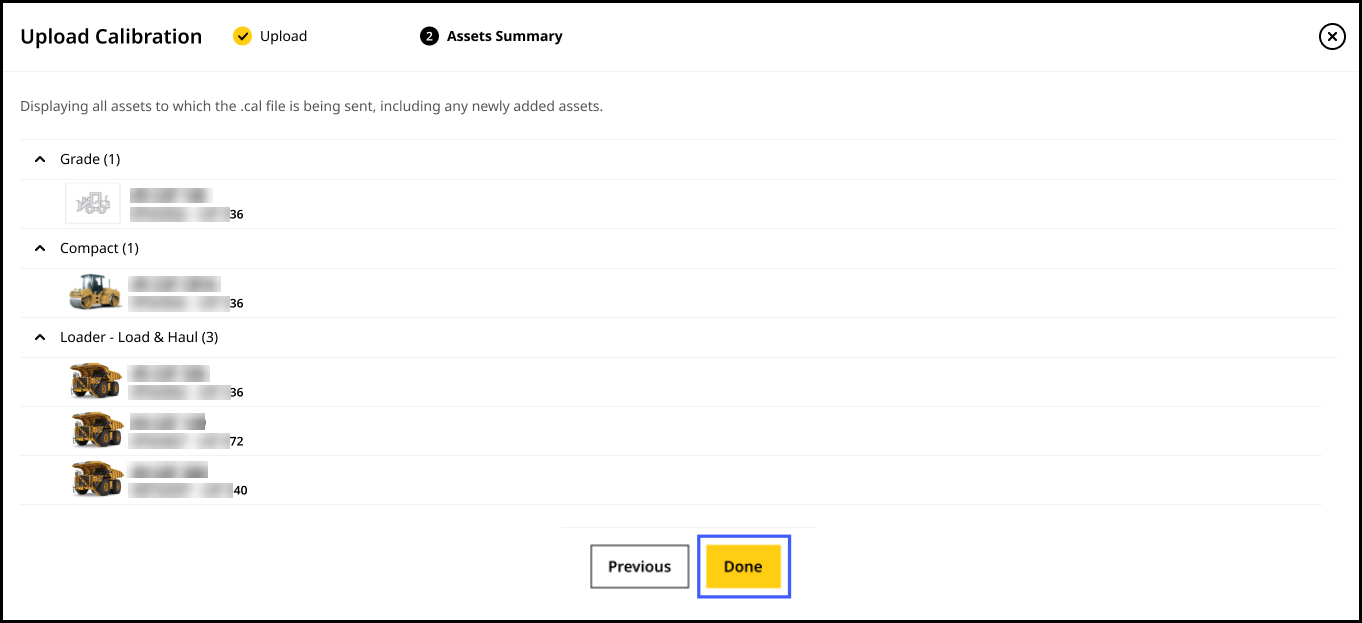
Once the process is completed, click Next to view Asset Summary. Here, you can see all assets that will receive the uploaded calibration file. Click Done.
Creating Calibration File Using GNSS Control Points
Create a calibration file in the application using control points known both in Global Navigation Satellite System (GNSS) and local coordinates system. Upload GNSS control points file (Name, Latitude, Longitude, Height) and local points file (Name, Northing, Easting, Elevation) in .csv or .txt format to generate site calibration file (.cal). This file can be sent to the assets.
To create a calibration file using GNSS control points:
- Navigate to Manage > select Files > click
 .
. - Select Calibration and select GNSS Control Points under Create from expanded menu.

-
Select the desired site from the Site Name drop-down.
On the Site Name drop down, you can search for your desired site in case to quickly find and select them.
- Drag and drop the file from your device or click Browse to find the file.
• On Create Calibration, you can only upload .csv and .txt files.
• You can upload both the following control point files at the same time or separately:
◦ WGS84 GNSS (Global Navigation Satellite System coordinates in WGS84 datum)
◦ Local control points (coordinates in your project’s local reference system)
View ImageView Image

• Only one active calibration file can be uploaded to a site.
• To upload a calibration file, a site should have an existing site boundary or you will need to create one. Refer to Create or Modify Site Boundary to Upload Calibration File to know more.
View ImageView Image


-
On Import Control Point Files, select coordinate category contained in the respective file from the Category drop-down.
• Once category is selected for one file, the corresponding category for the other file is selected by default.
• Click Preview to view all control points available in the uploaded file(s).
-
Under File Configuration, select your preferred unit of measurement (UoM), Field Separator, Latitude/Longitude and Field Order (PNEZ and PENZ) from the respective file’s drop down for the selected category.
• Both files must use the same unit of measurement. When you select a unit for one file, it automatically applies to the other.
• You can preview file and configure each option based on the file’s layout and format.
• You may check File’s top row includes headers if the uploaded files have headers that need not be considered.
-
Click Import to view the uploaded files and additional details for confirmation before proceeding.
In case you wish to remove the uploaded file, click remove and re-upload the preferred file.
-
Click Next to import the uploaded control points.

-
Once import is successfully completed, on Create & Upload .cal, view all matched control points. You can also view these points plotted on the map as well.
Only control points that match between the two files are displayed.

-
Enter the Threshold value to set a limit to determine the accuracy or deviation of the imported control points during site calibration. The value should be a decimal number.
-
Check Control Points to select all available control points or manually select the preferred ones.
-
After checking the points, the Horizontal Residual and Vertical Residual values are displayed.
• Horizontal or vertical residual values that exceed the specified threshold value display in red.
• If you uncheck any checkbox or change any threshold value, the error values recalculate accordingly. -
On map view, all matched control points are displayed. After checking all control points, each point displays arrows corresponding to the selected horizontal and vertical residual.
• Refer to the legend on the map to know more.
View ImageView Image

◦ None: No control point is selected.
◦ Both: The horizontal and vertical residual points of the control point are selected.
◦ Horizontal Only: Only horizontal residual of the control point is selected.
◦ Vertical Only: Only vertical residual of the control point is selected.
• You can also do the following:
◦ Use Zoom in to view the points and location details.
◦ Use Zoom out to view all the available points.

-
Click Create to create the calibration file with the available control points.
-
On Upload Calibration File, edit the name of the file, if required.
Click Preview to view the following site calibration details.
View ImageView Image


-
After previewing details, click Upload to upload and process the calibration file.
-
After the file is successfully uploaded, click Next to view all assets to which the newly uploaded calibration is being sent. Click Done to complete the process.

Uploading Design Files
Design files enhance site monitoring and display updates over time and work. You can upload various kinds of design files.
• It is recommended to upload design files less than 25MB in file size. This ensures optimum asset performance.
• Design files must not exceed 50MB in file size.
• Before uploading design files, a calibration file must be available on the site.
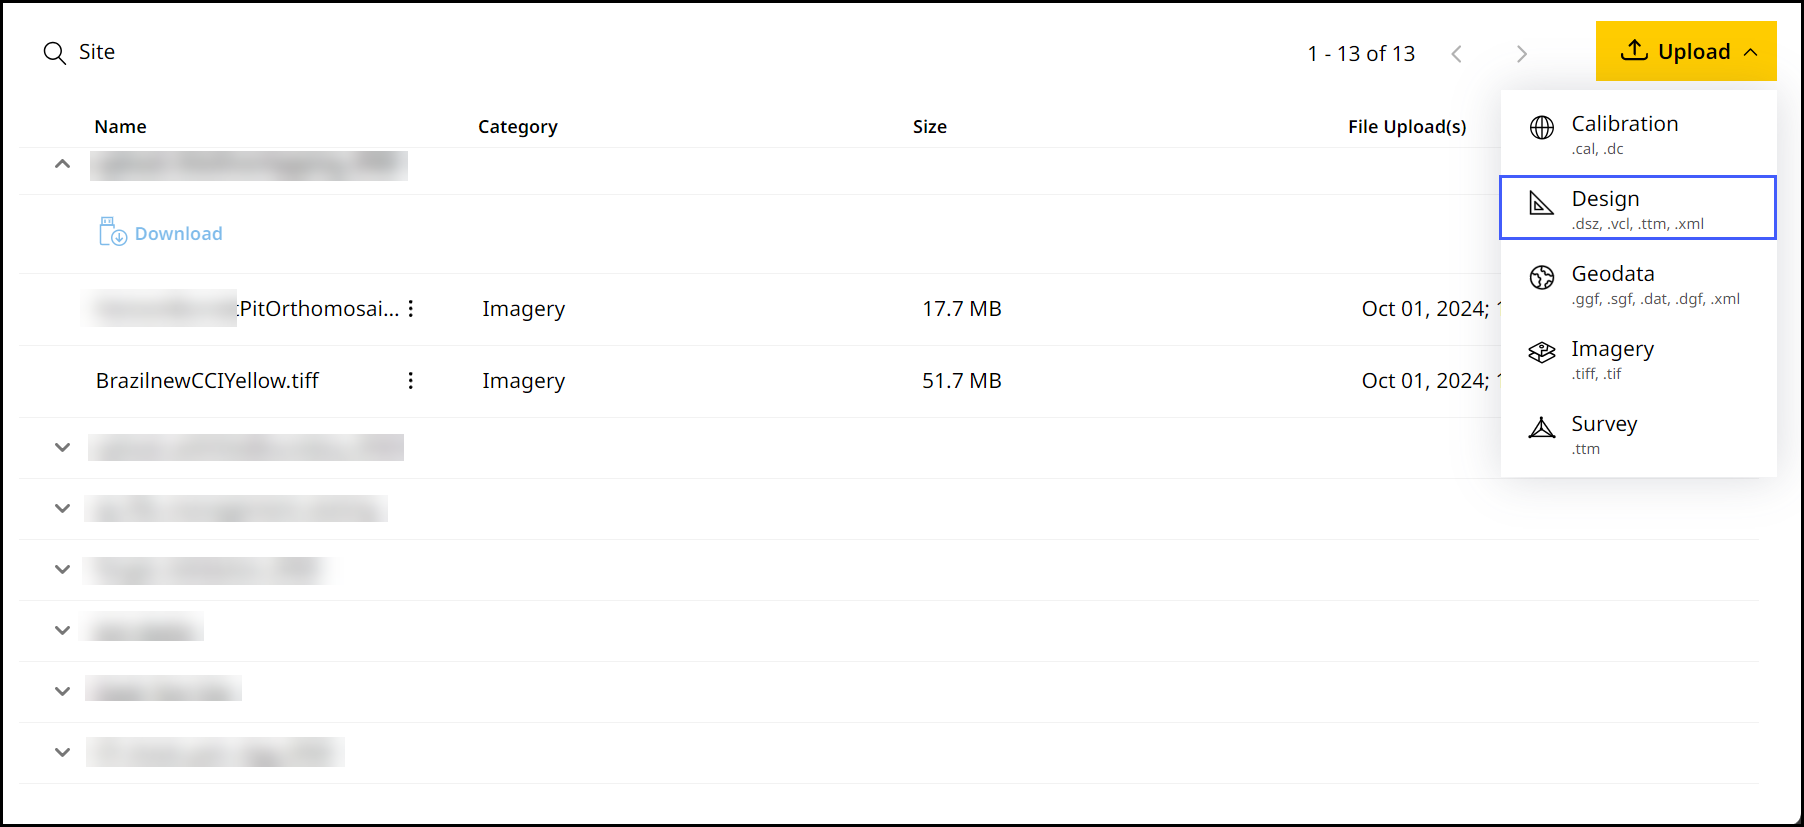
To upload design files:
-
On Files, click
> select Design.
-
Select the desired site from the Site Name drop down.
On the Site Name drop down, you can search for your desired site in case to quickly find and select them.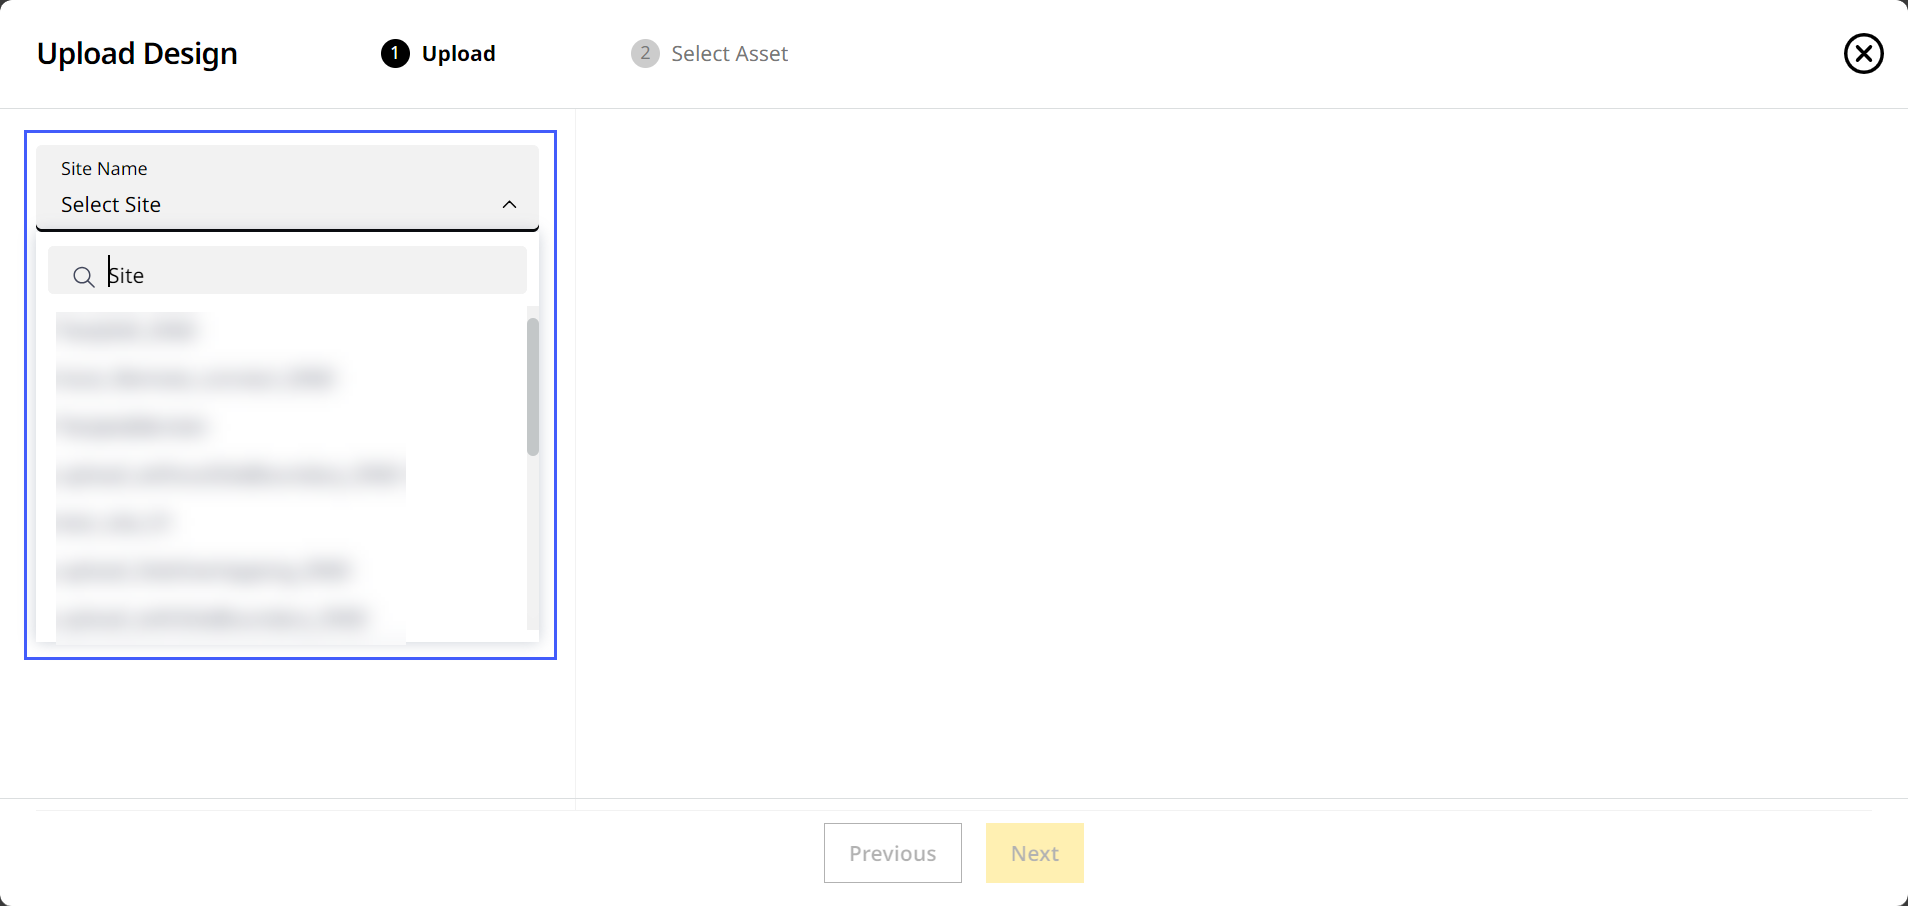
-
Drag and drop the file from your device or click Browse to find the file.
On Upload Design, you can only upload .dsz, .vcl, .xml (landXML) and .ttm (office design) file types.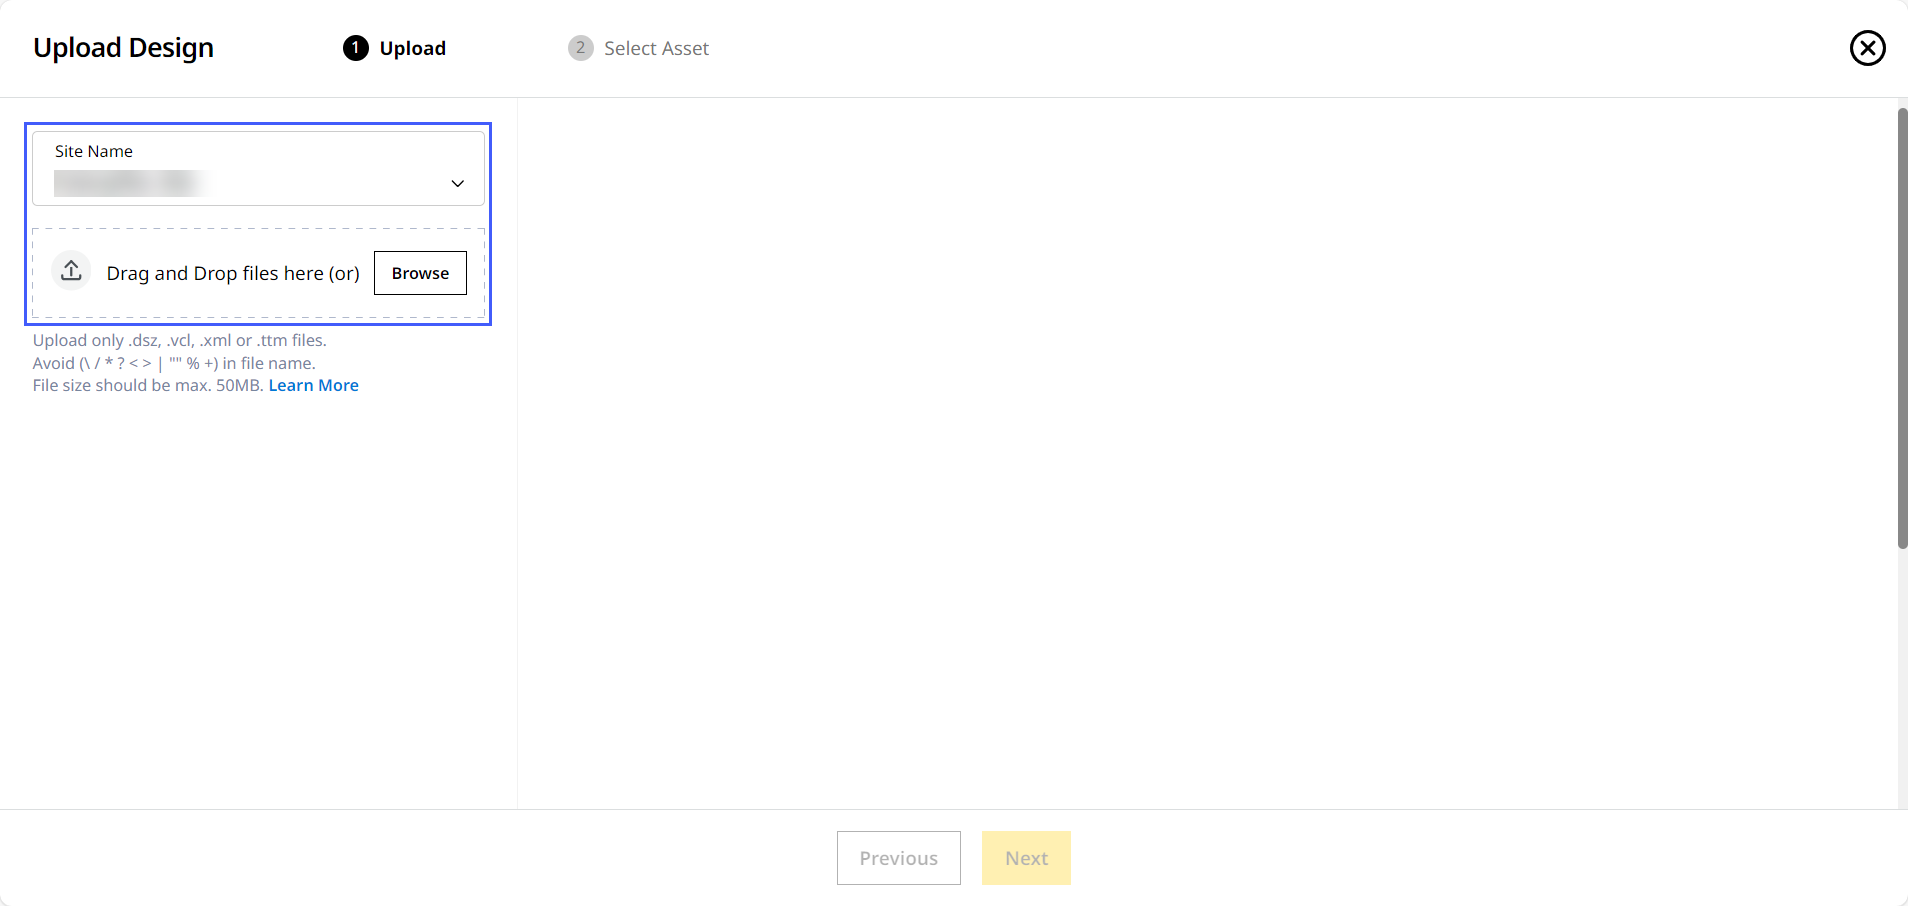
-
Give it a few minutes for the upload to complete.
-
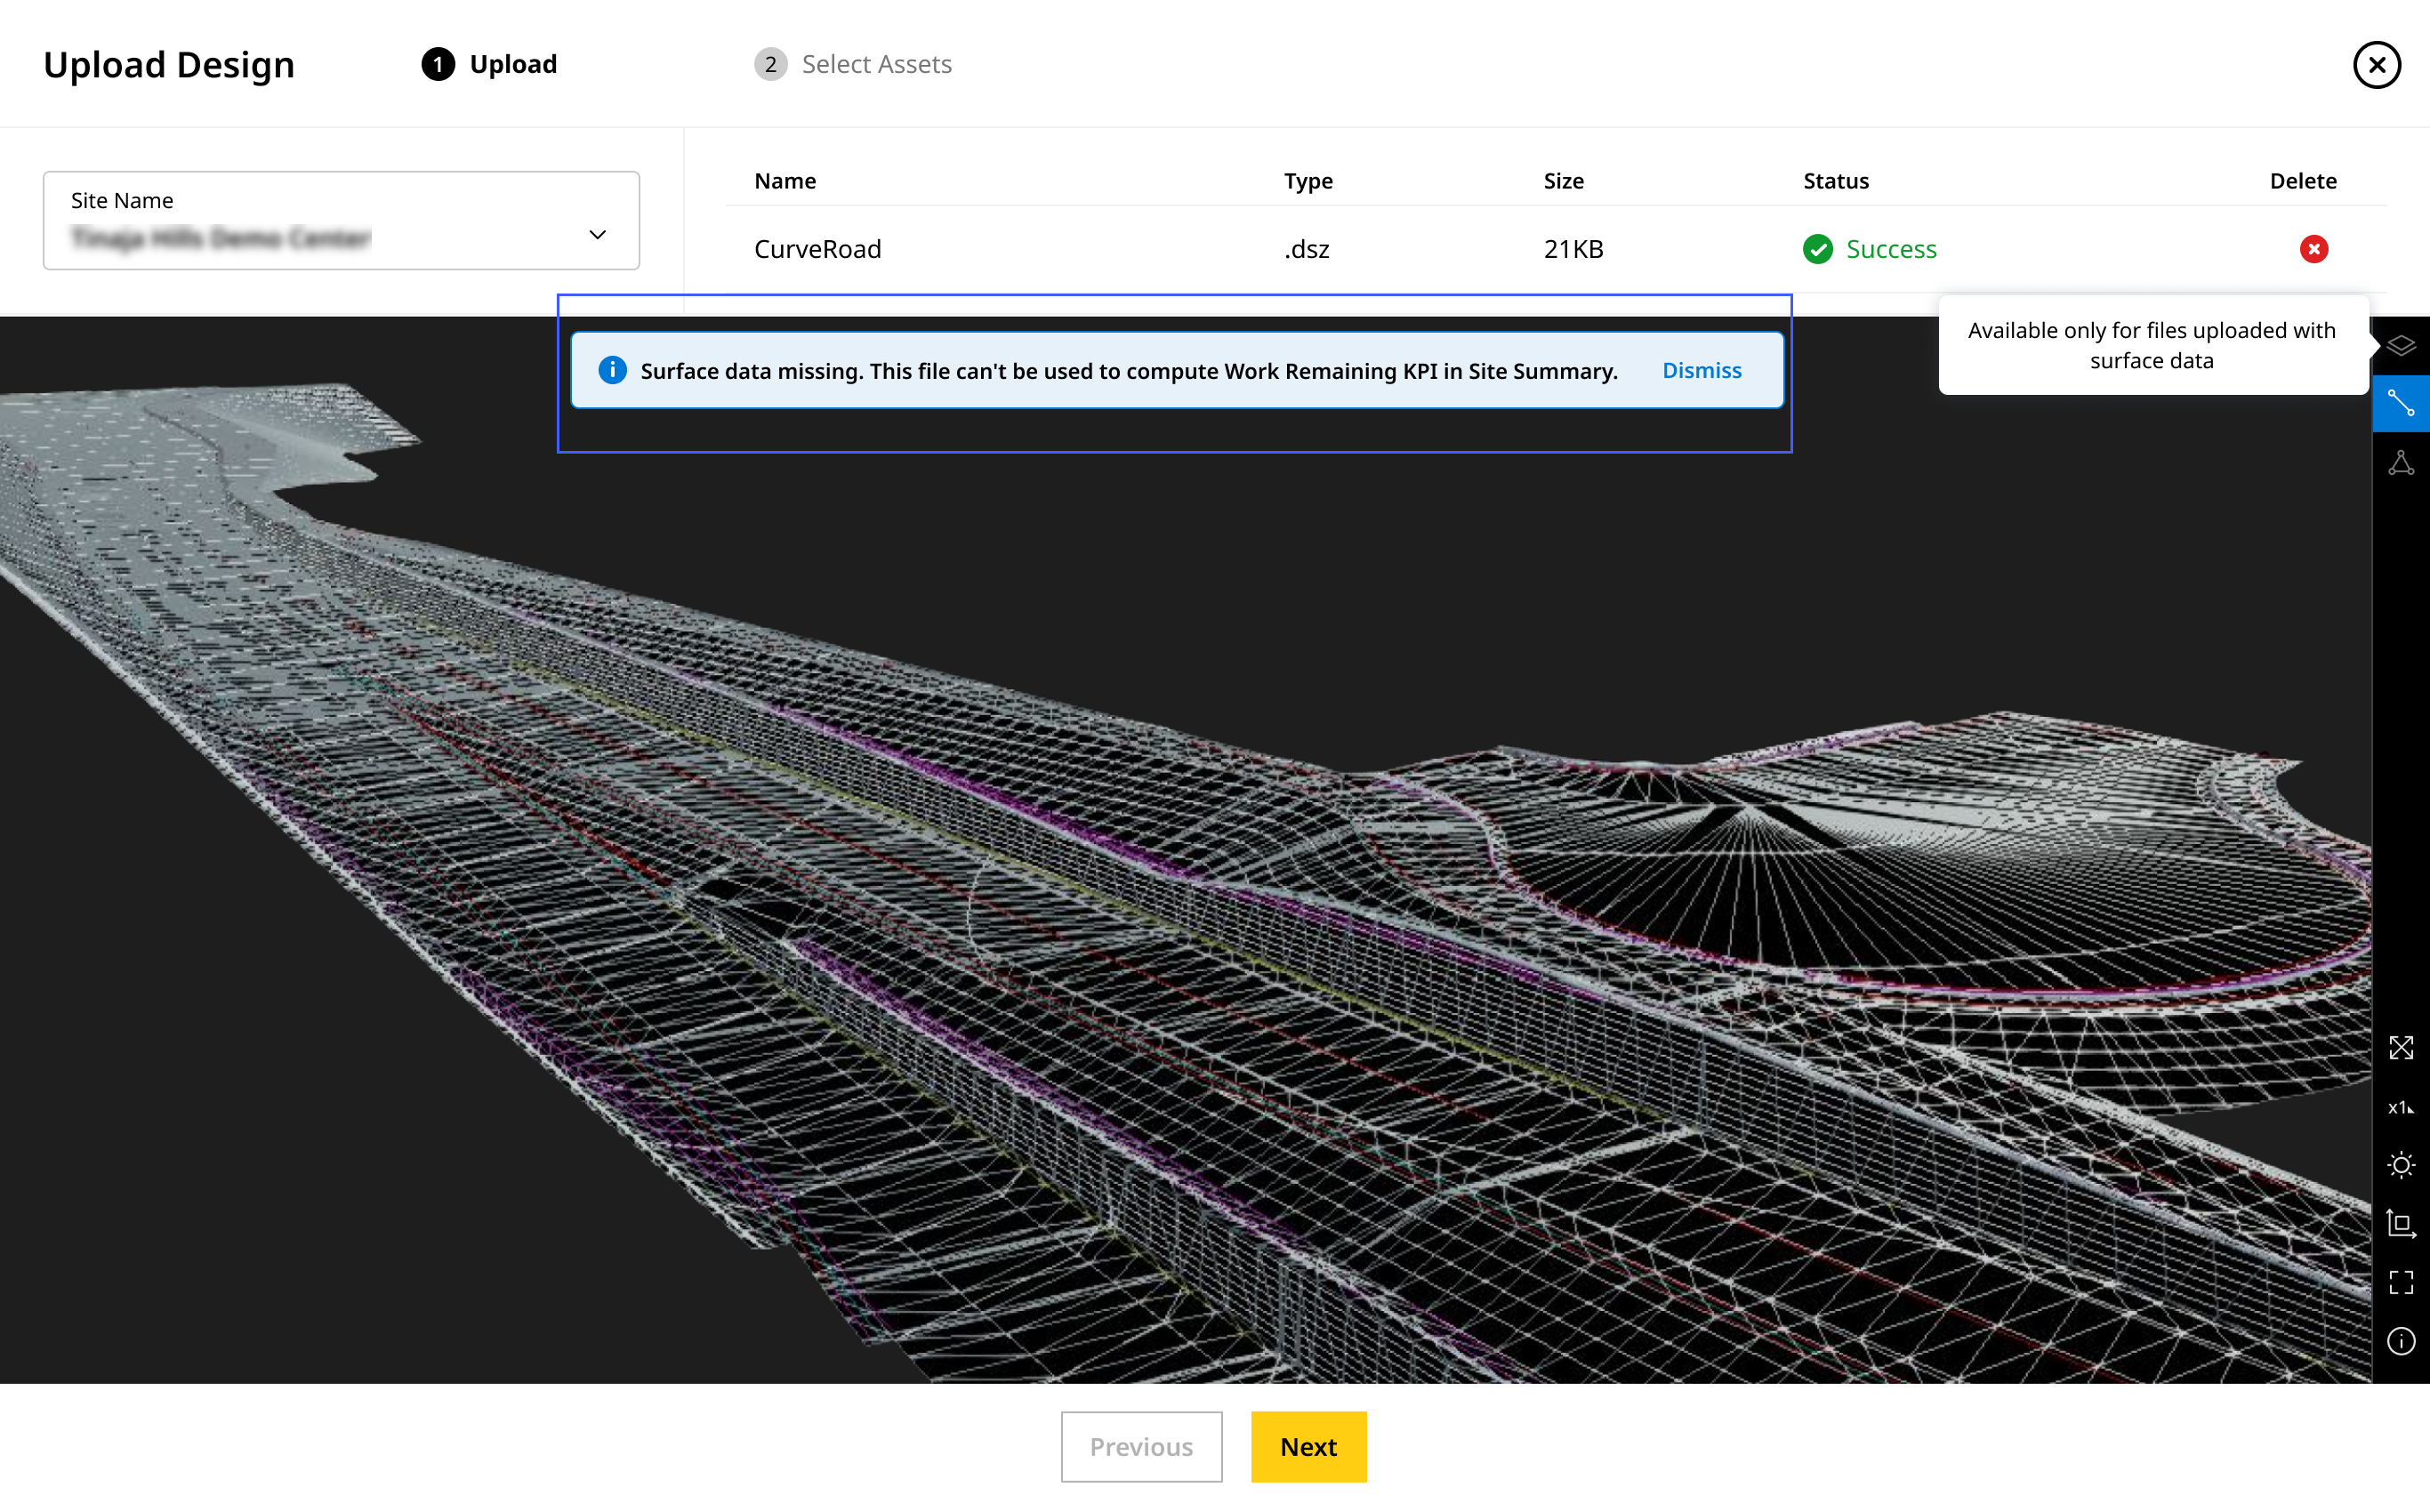
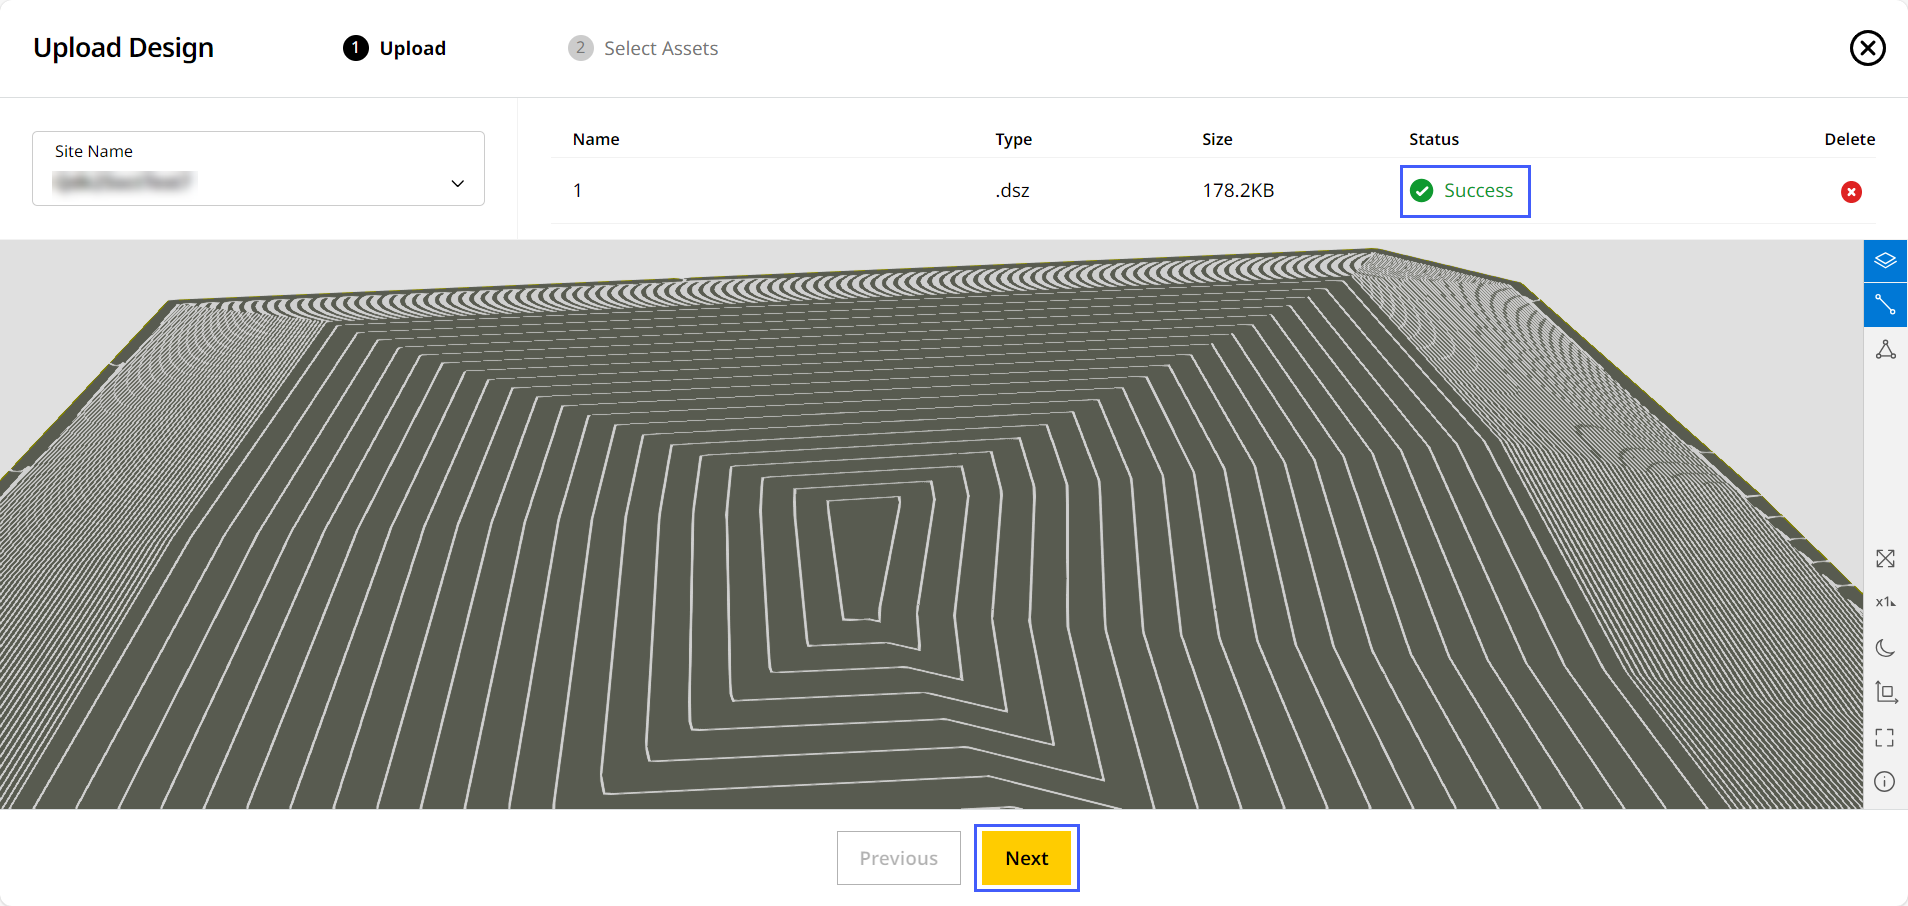
A successful upload of the file will be denoted in the Status column. Click Next to proceed.
• If you're uploading .dsz files, .xml or .ttm files, a 3D visualization will be generated for you to preview. Refer to Preview File to know more.
View ImageView Image
• .dsz files comprise of .svd (design) and .svl (linework) files. If either are missing or the uploaded file is corrupted, the 3D preview model will be incomplete and respective error message display.
◦ If neither are available, the .dsz file won’t be processed or sent to the asset.
• For landXML (.xml) files, the following applies:
◦ The previewed file displays the surfaces in the same order as arranged in the file.
◦ The first (top-most) surface is selected by default, but the first processed surface displays first in the preview.
◦ Only valid surfaces will be displayed in the preview.
▪ If all the .xml file surfaces are invalid/unavailable, only the linework data displays in the preview. This file won’t be used to calculate the Work Remaining KPI.
▪ If linework data is invalid/unavailable, you won’t be able to select linework .
.
View ImageView Image
▪ If the .xml file has duplicate surface names, it will be considered invalid. Ensure the surface names are unique and re-upload the file.
View ImageView Image

-
Your files are being prepared for asset sync.
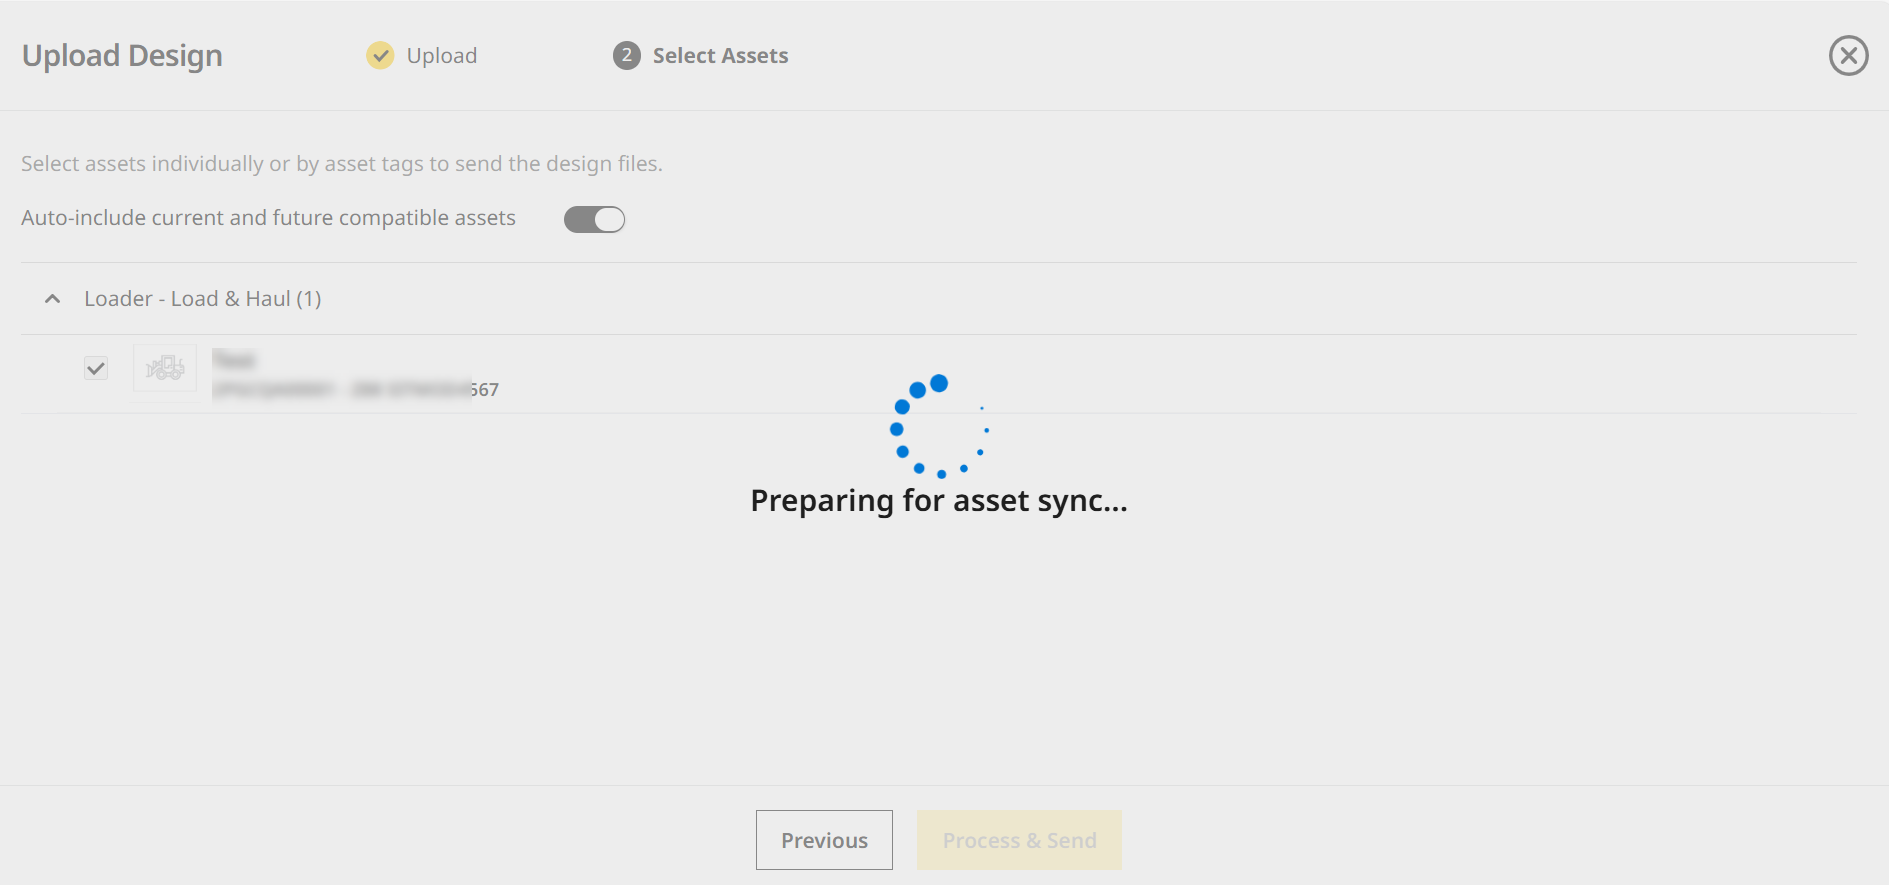
-
On the Select Assets step, choose the assets where you want to send the uploaded files. Click Process & Send to proceed.
The Select Assets step is available only for .dsz, .vcl and .xml files.
View ImageView Image

Click toggle on to select all assets in the list below and any more compatible assets added to the site in the future. This ensures the file will be synced to all of them going forward.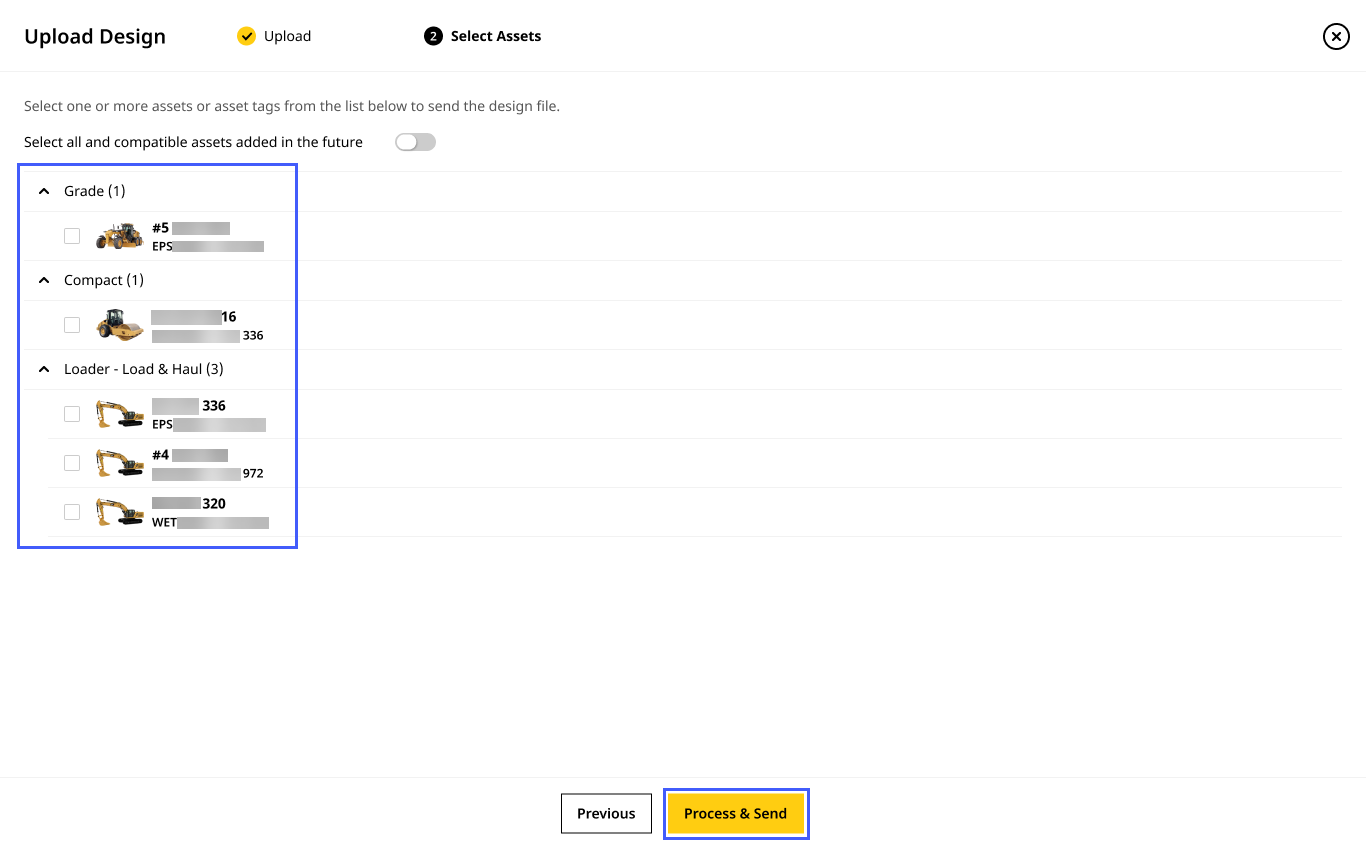
Uploading Geodata Files
Geodata files are sometimes used when site calibrations are created. If a surveyor uses a geodata file (like a geoid file) when creating the calibration file (.cal), the geoid files need to be uploaded to the asset.
These files ensure more accurate reporting of site and asset data.
• To know more about geodata files, reach out to your project’s survey manager.
• You must also upload calibration and CoordSystemDatabase.xml files to the relevant site as well.
• The geoid, calibration and CoordSystemDatabase.xml file names should match, both offboard (on the application) and onboard the asset.
• Any .xml file not named as CoordSystemDatabase.xml can only be uploaded as a design file.
• You can only upload one calibration and geoid file type per site. If you want to re-upload a geoid file of a particular file type, you’ll need to delete the existing one first.
For an optimum experience while using geoid files, upload files in the following order:
1. Calibration file
2. Geodata file
3. CoordSystemDatabase.xml file
To upload geodata files:
-
On Files, click
> select Geodata.
-
Select the desired site from the Site Name drop down.
On the Site Name drop down, you can search for your desired site in case to quickly find and select them.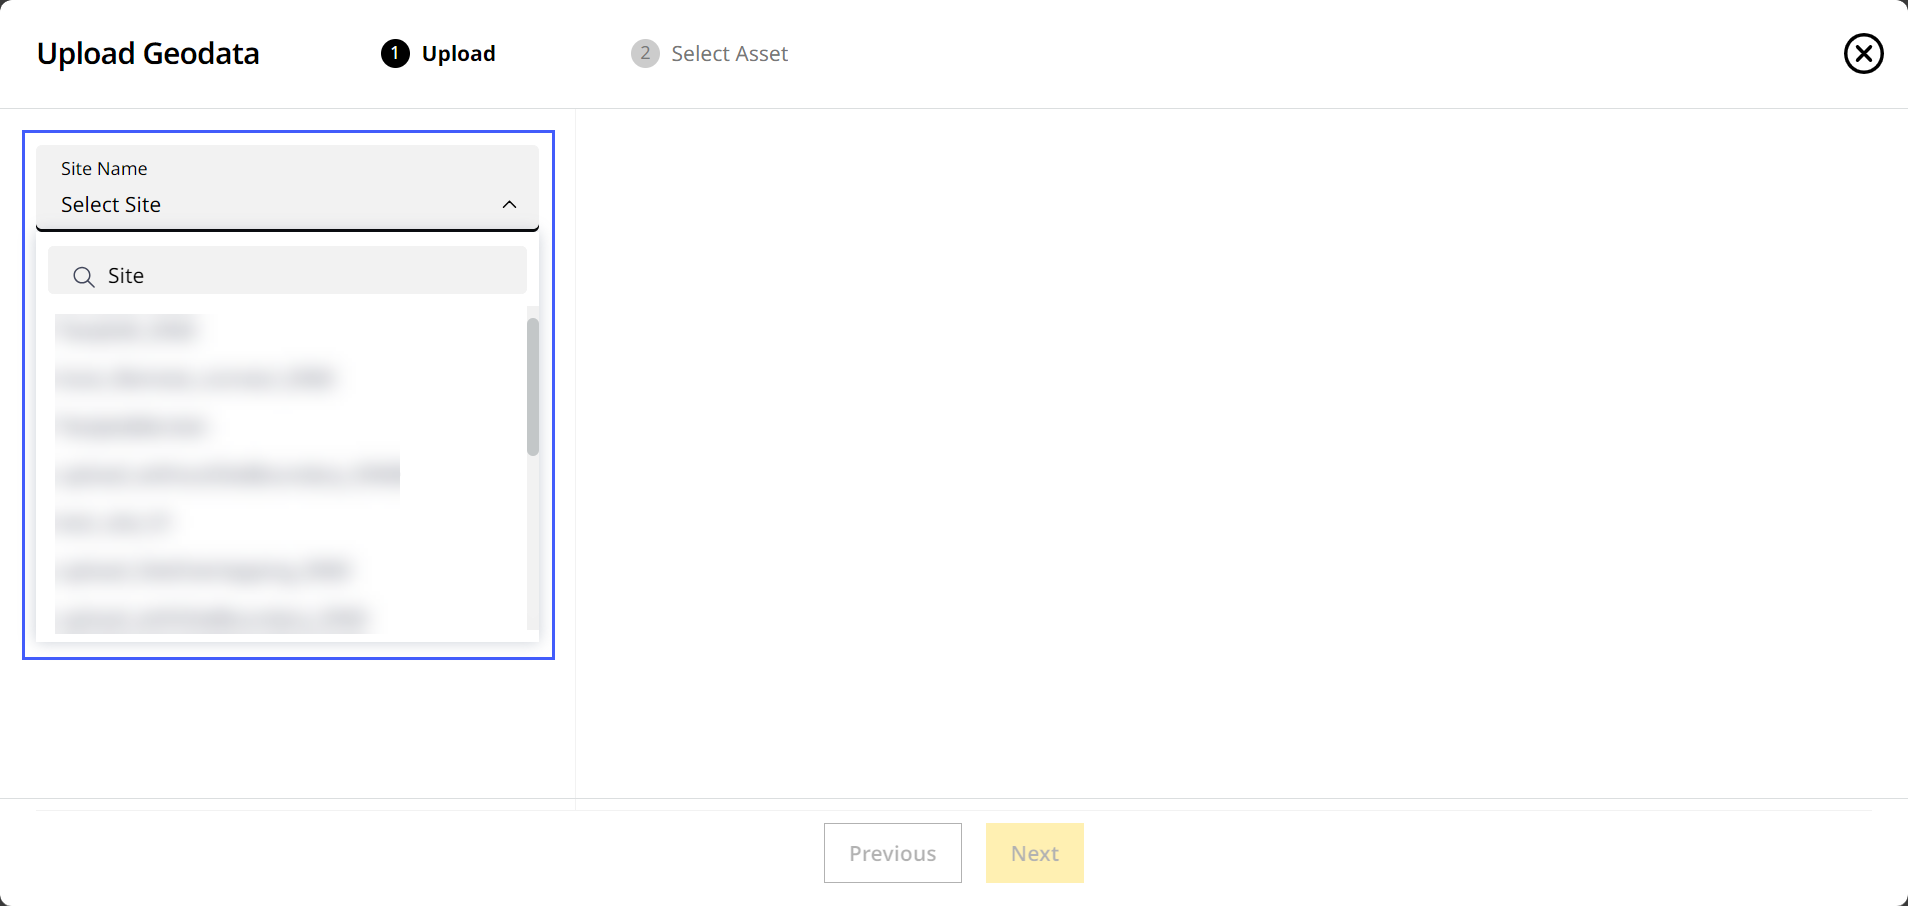
-
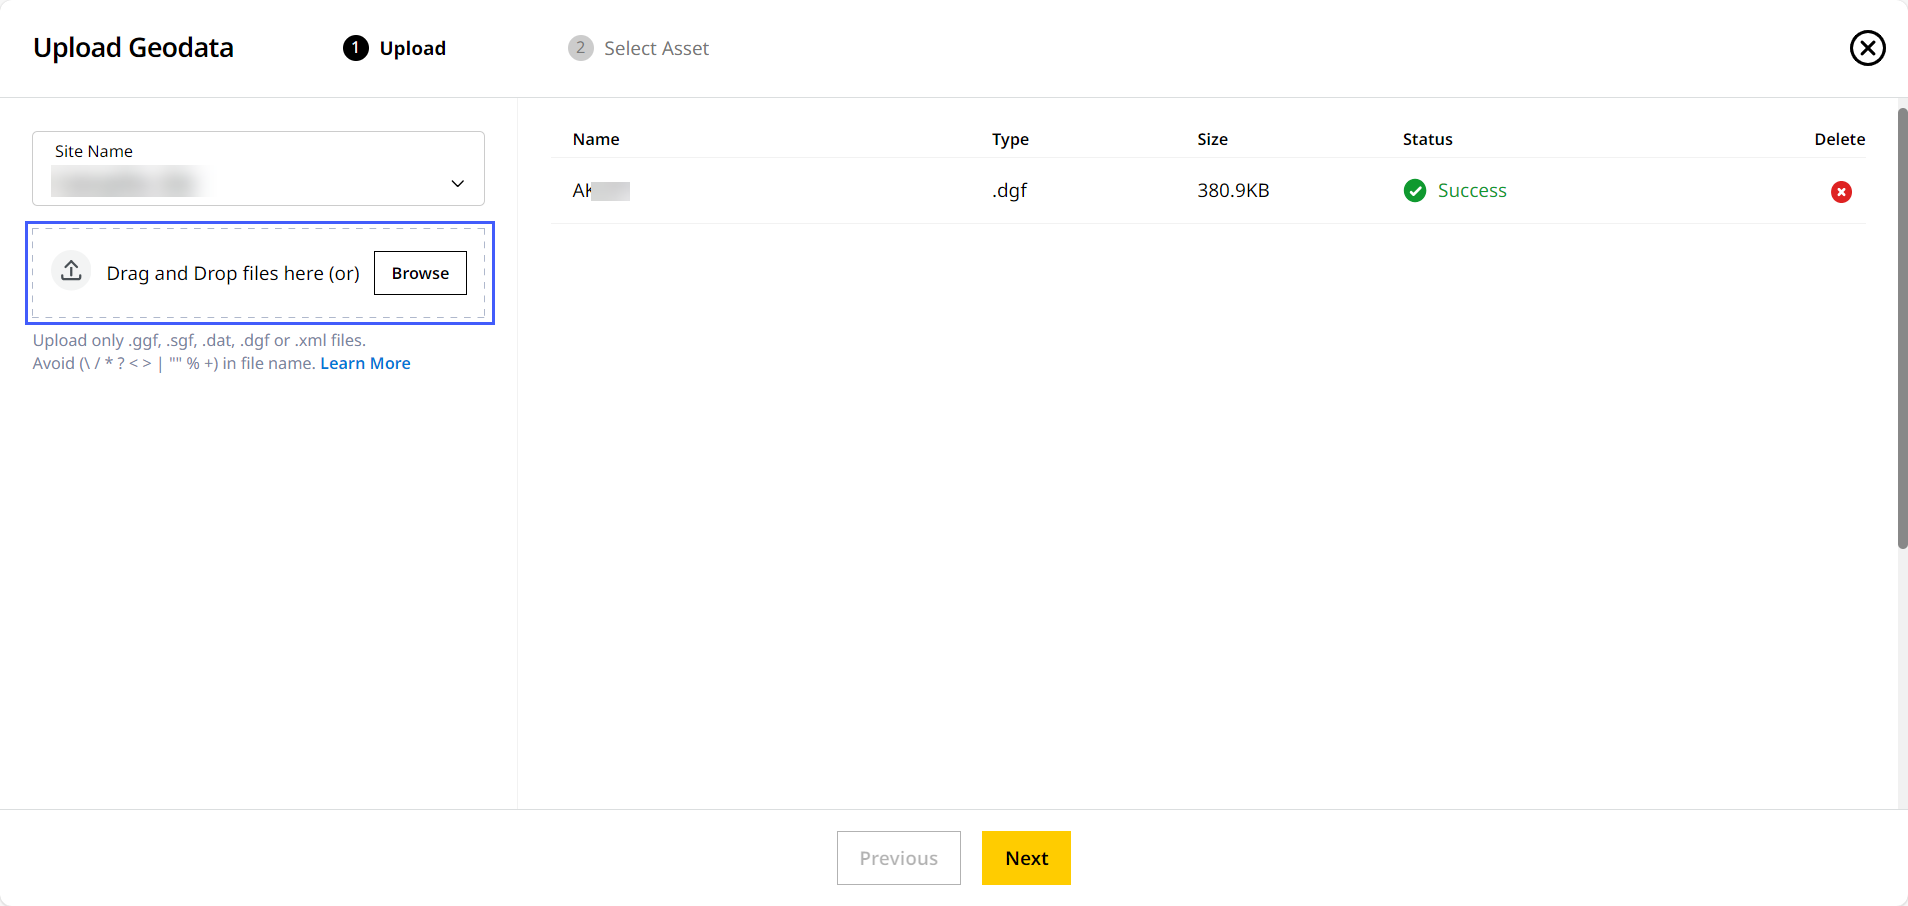
Drag and drop the file from your device or click Browse to find the file.
-
Geodata file
• Your site may already have a calibration file uploaded prior. If so, you can upload geodata file without it referenced in the calibration file.
◦ If a calibration file references a specific geoid, the referenced geoid (.GGF) file must be uploaded to ensure the calibration can be used on the asset.
• Only one geodata file of each file type can be uploaded to a single site at time. Delete the existing geodata file of a particular file type before uploading another one of the same type.
• Ensure the geodata file has the specific geodata file with file name referenced.
• You can upload either published or custom geodata files of the following file types: .ggf, .sgf, .dat and .dgf.
◦ If you’re uploading a custom geoid file, ensure you’ve edited the CoordSystemDatabase.xml file to reference the same.-
Give it a few minutes for the upload to be completed.
-
-
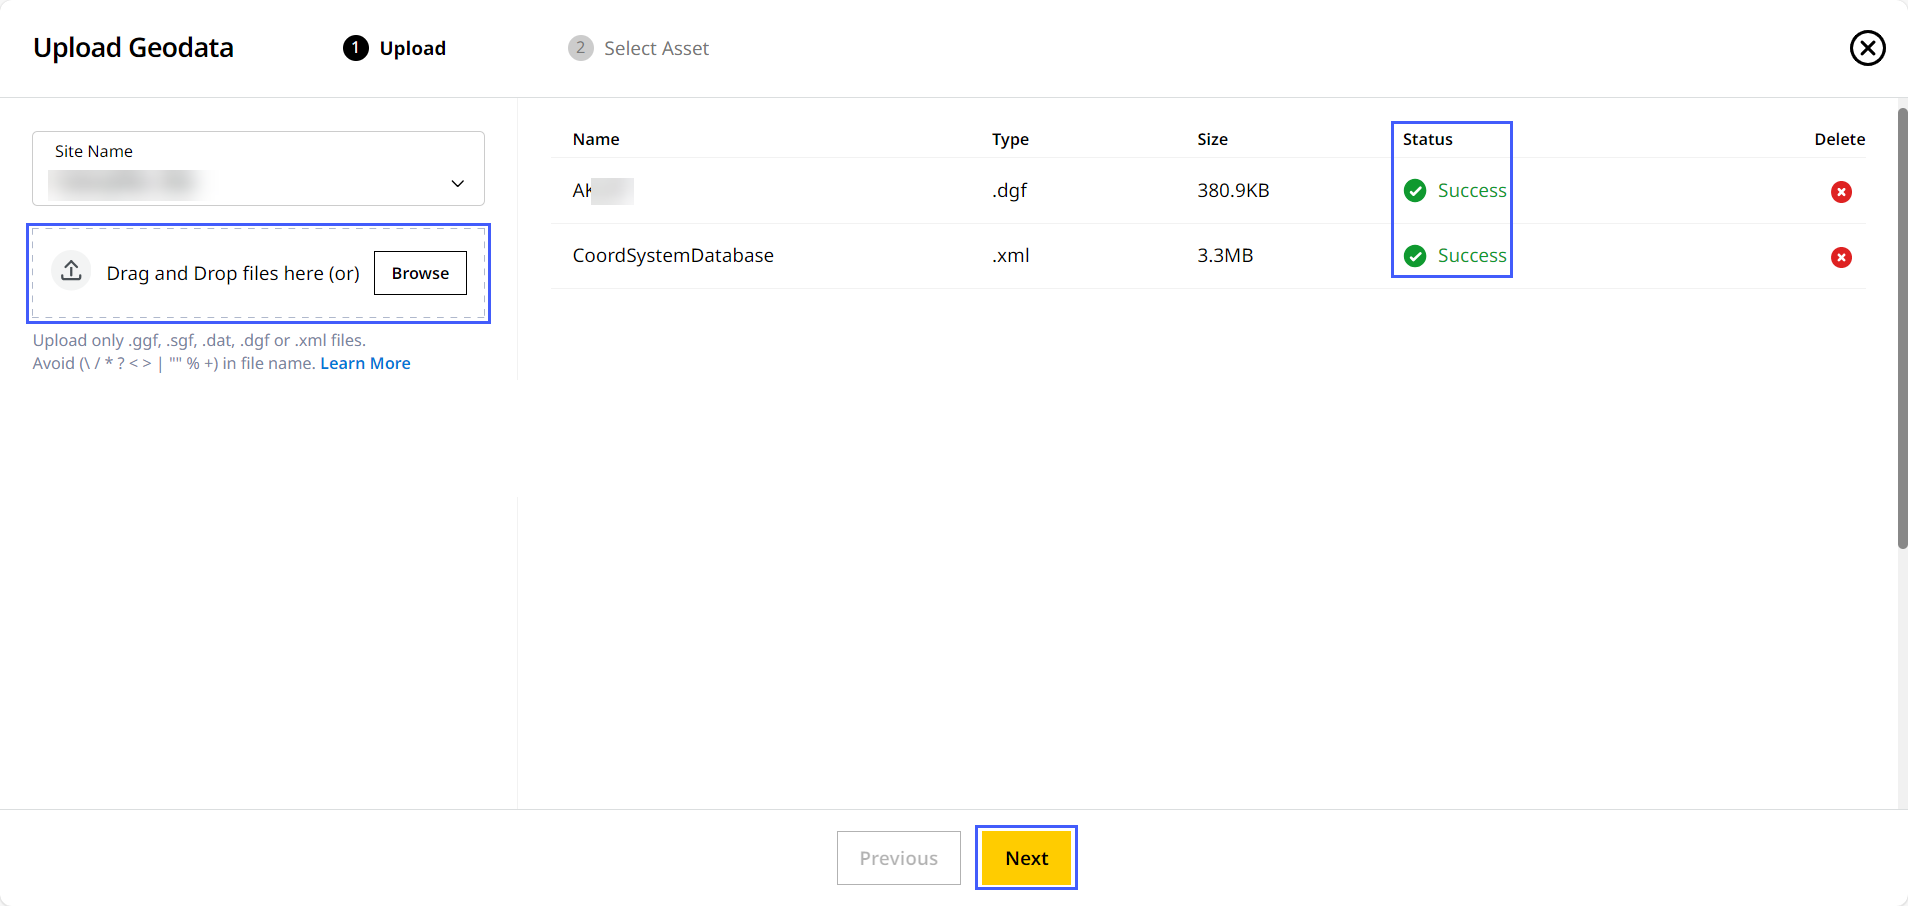
Relevant CoordSystemDatabase.xml file:
• The CoordSystemDatabase.xml file should be referenced in both the geodata and calibration files uploaded to that site.
• For custom geoid files, you’ll need to update the CoordSystemDatabase.xml file accordingly.
• Under Upload Geodata, you can only upload CoordSystemDatabase.xml files. No other .xml files are supported. To upload other .xml files, refer to Uploading Design Files.-
Give it a few minutes for the upload to be completed.
-
A successful upload of the file will be denoted in the Status column. Click Next to proceed.
-
-
-
On the Select Assets step, choose the assets where you want to send the uploaded files. Click Process & Send to proceed.
Click toggle on to select all assets in the list below and any more compatible assets added to the site in the future. This ensures the file will be synced to all of them going forward.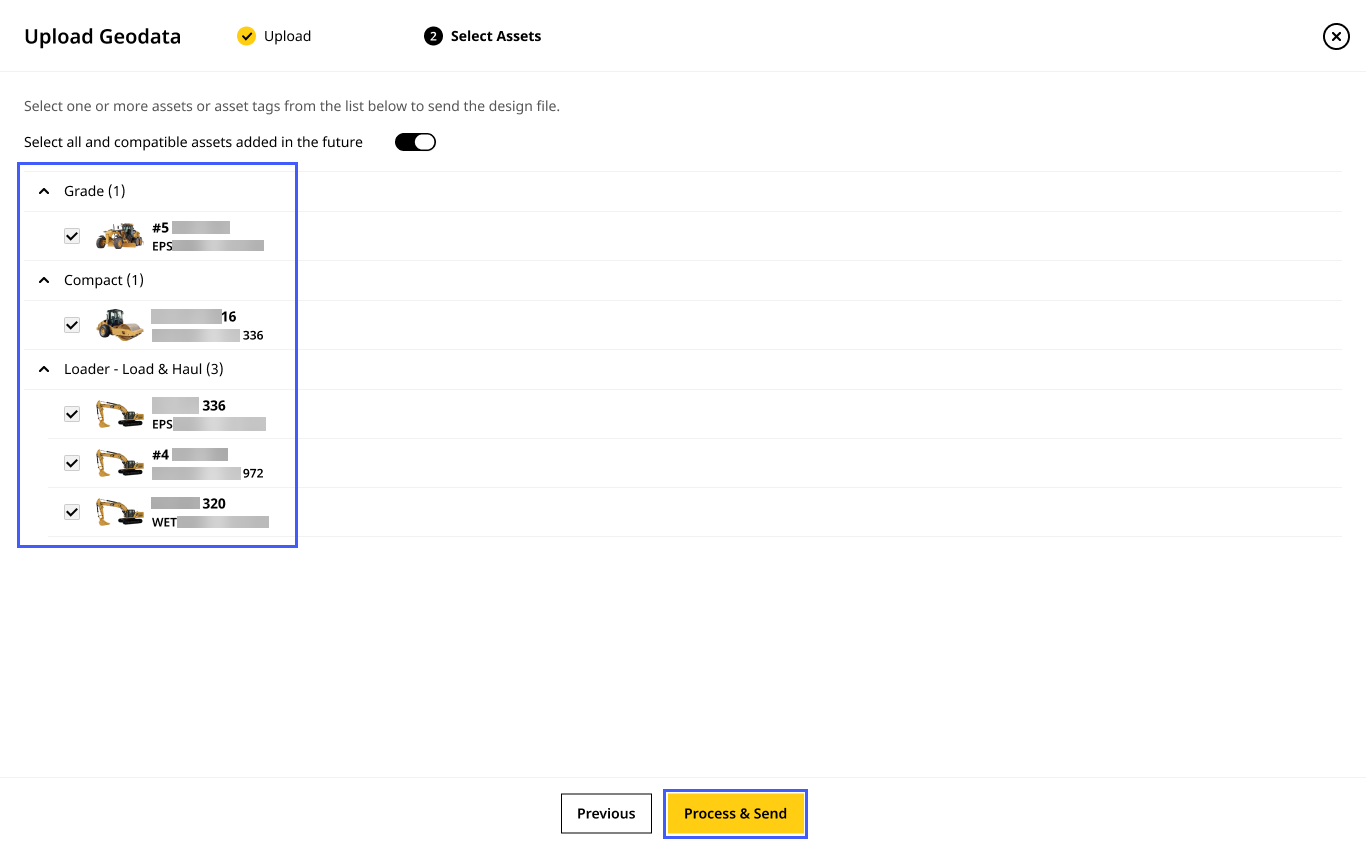
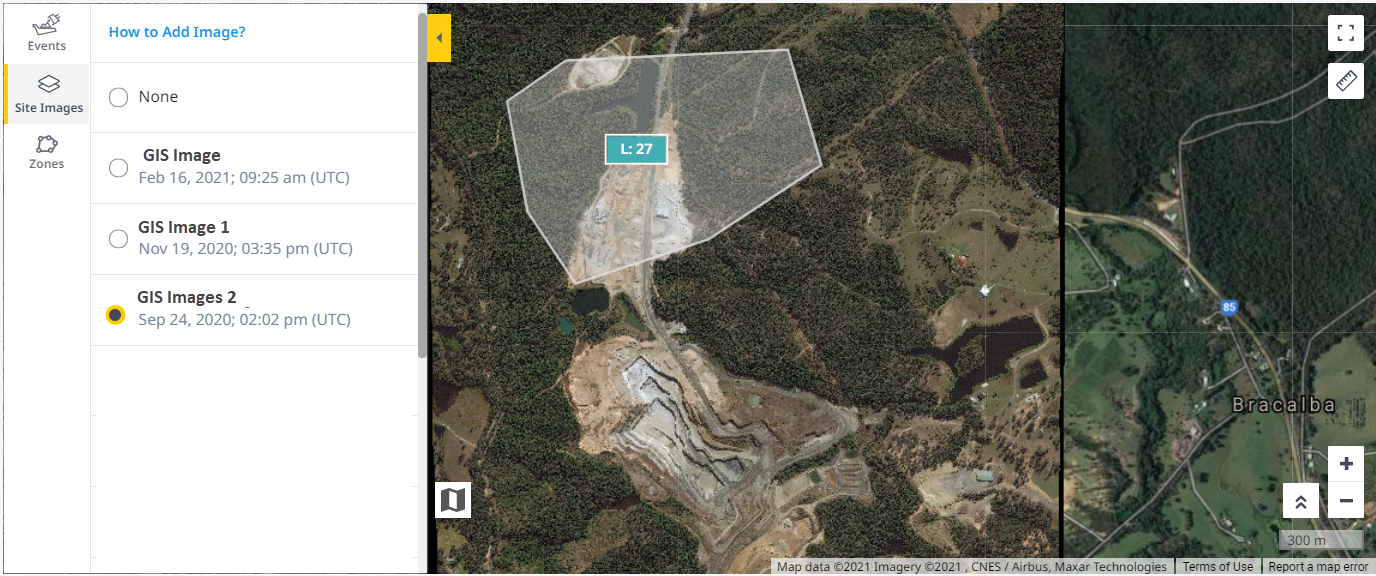
Uploading Imagery Files
Imagery files work as site images, helping you add layers to the existing map view across the application.
This allows for more accurate understanding and clarity of your site along with its terrain, zones and events.
![]()
You can zoom into the uploaded images from 15 to 20 levels (extended from site view to lane view).
• The site image should have a known EPSG published coordinate system (e.g., EPSG:4326) and bounding values with RGB coverage information.
• Currently there is no support for local coordinate systems when uploading these imagery files.
• Imagery files will be uploaded as is. Any trimming or editing needs to be completed prior to uploading.
• You can also copy a processed imagery file to another site within your account.
• Unlike other file categories, you can upload imagery files only to the site. It cannot be synced or sent to the site’s assets.
To upload imagery files:
-
On Files, click
> select Imagery.
-
Select the desired site from the Site Name drop down.
On the Site Name drop down, you can search for your desired site in case to quickly find and select them.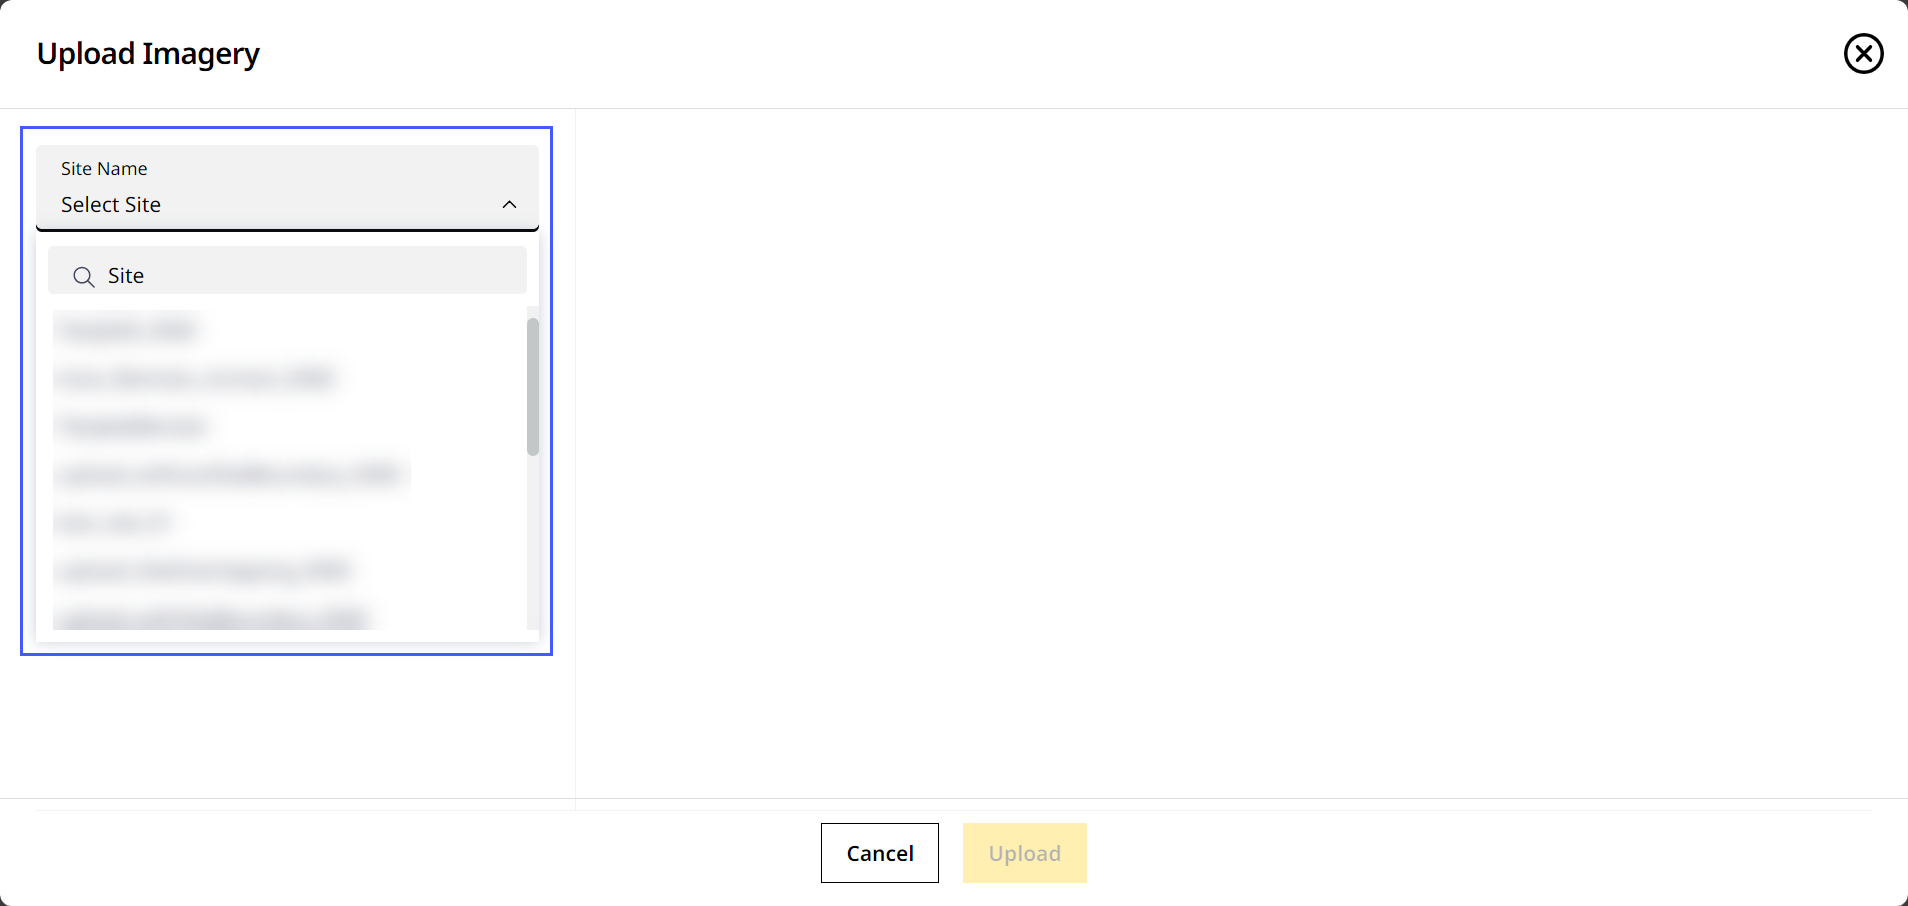
-
Drag and drop the file from your device or click Browse to find the file.
On Upload Imagery, you can only upload .tiff/.tif file types.
For imagery files, you can upload multiple files at the same time.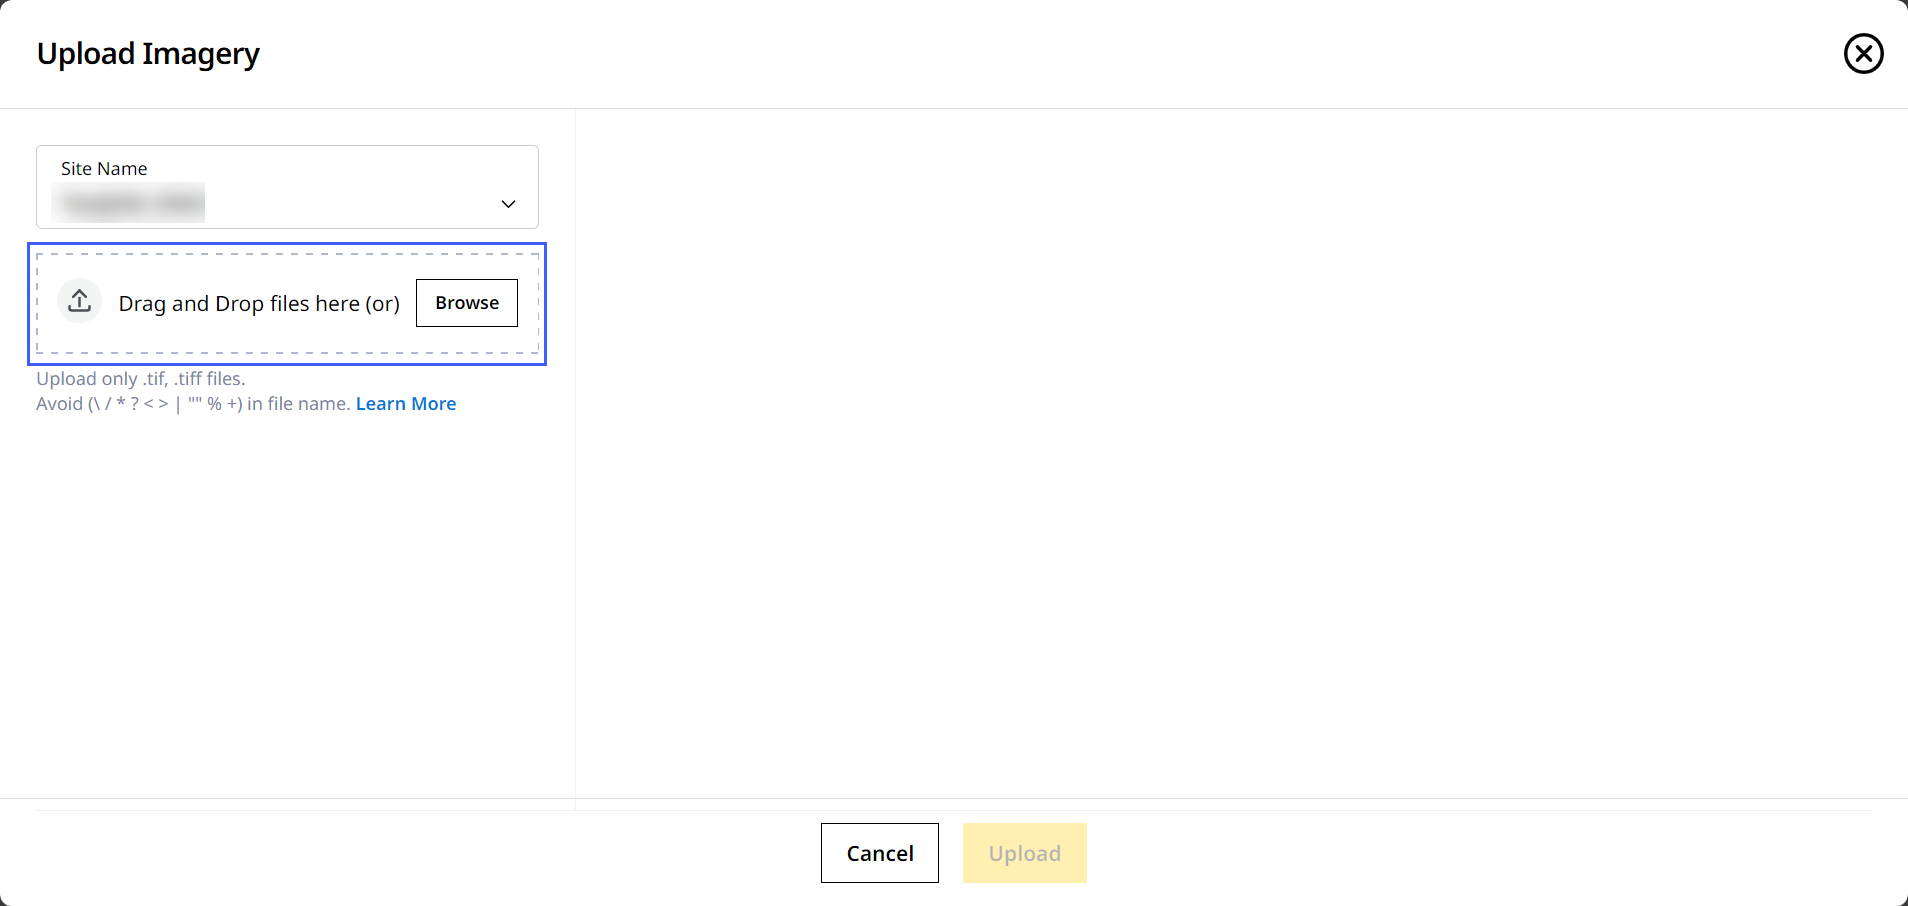
-
Click Upload to complete the process.

-
Give it a few minutes for the file(s) to upload.

Uploading Survey Files
Survey files are triangulated surface files that represent the ground state at a specific moment in time. The survey file can be created using survey administrators or drones, incorporating survey measurement and data. Survey data is used to build composite surfaces throughout the application.
Once uploaded into VisionLink Productivity, all survey files are time-stamped.
To upload survey files:
-
On Files, click
> select Survey.

-
Select the desired site from the Site Name drop down.
On the Site Name drop down, you can search for your desired site in case to quickly find and select them.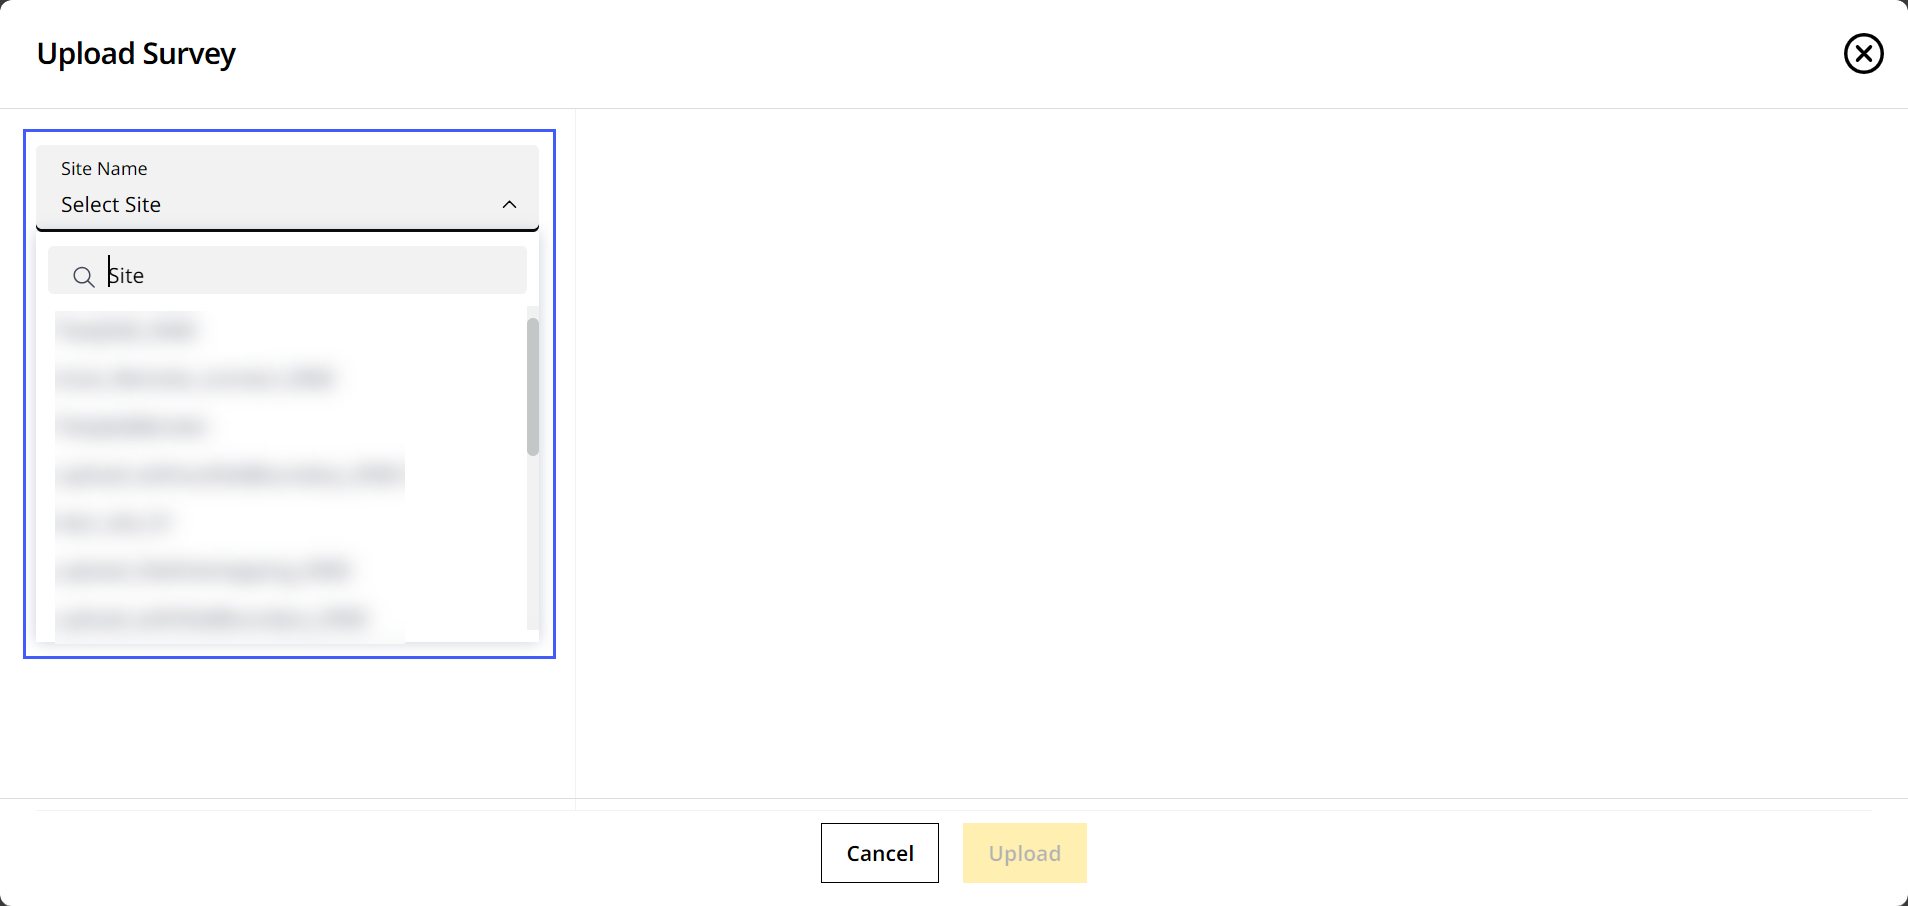
-
Drag and drop the file from your device or click Browse to find the file.
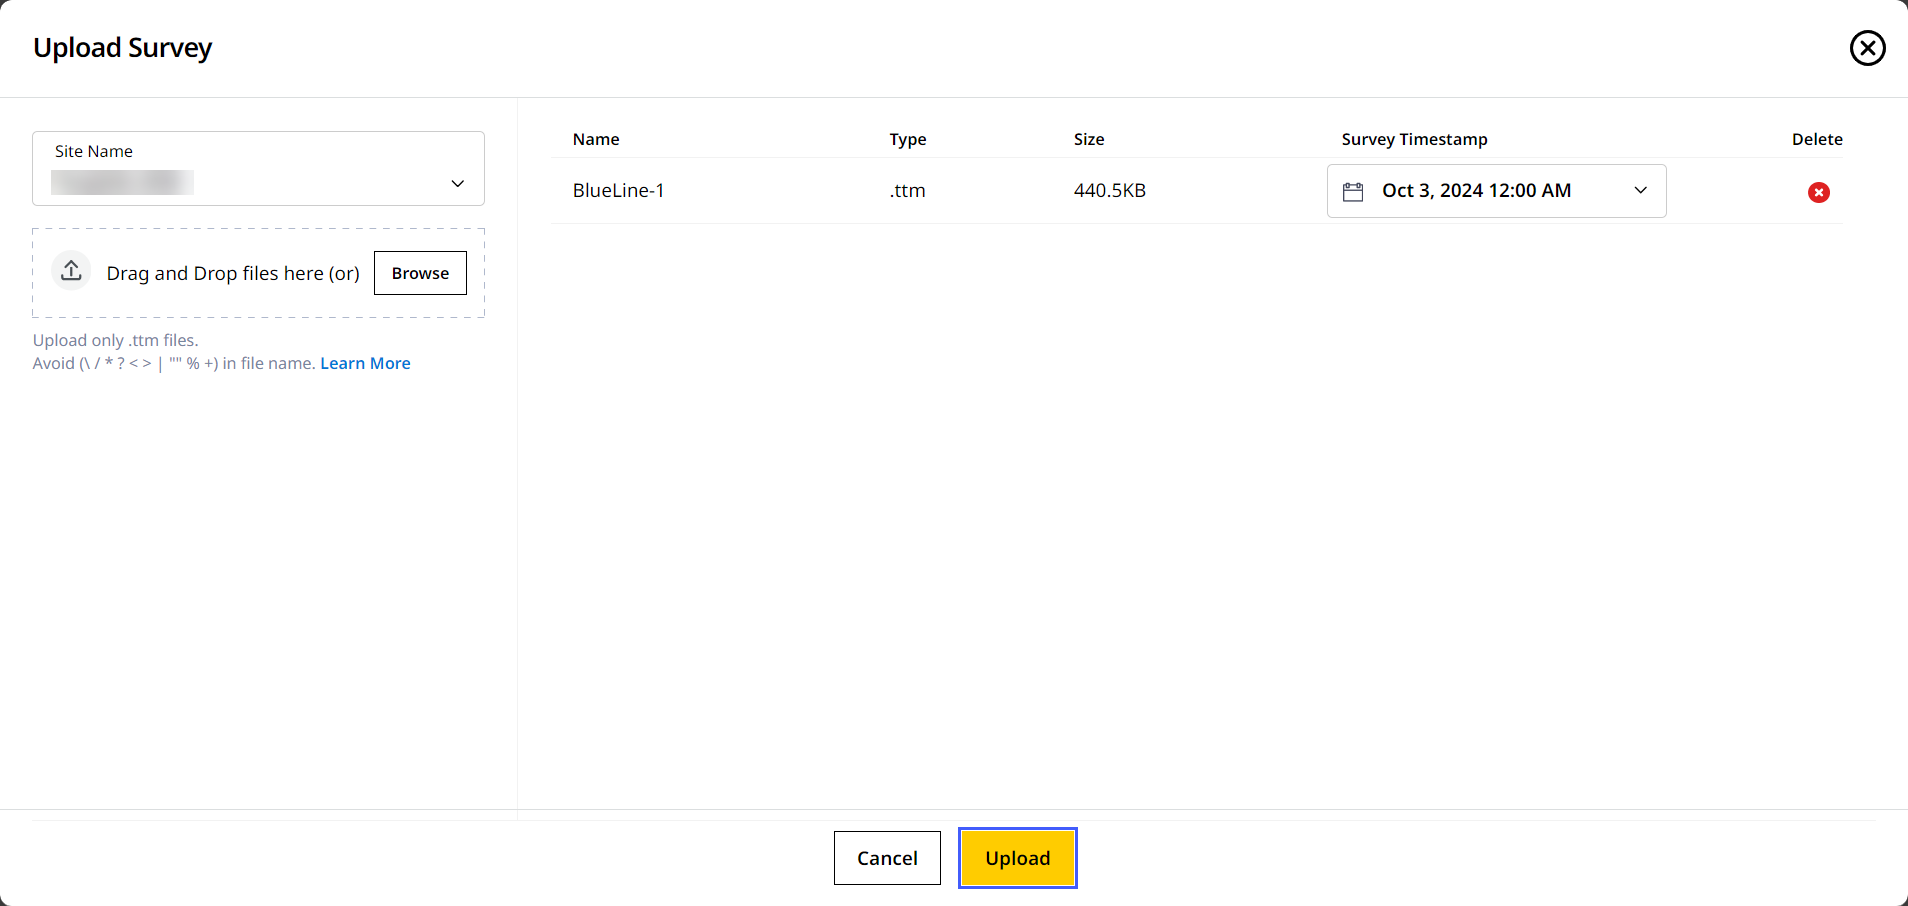
• On Upload Survey, you can only upload survey-based .ttm file types.
• The .tiff (geoTIFF) files must contain only the WGS84 coordinate reference system.
-
Under Survey Timestamp, select the date and time the file was created. Click Apply to save the date and time.

-
Click Upload to complete the process.
-
Give it a few minutes for the file(s) to upload.
If you're uploading .ttm file, a 3D visualization will be generated for you to preview. Refer to Preview File to know more.
View ImageView Image
